We have already seen how to use Hibernate ORM tool in standalone java application, today we will learn how to use Hibernate with DataSource in Tomcat servlet container. Using hibernate in web application is very easy, all we need is to configure DataSource properties in hibernate configuration file. First of all we need to setup test database and JNDI DataSource in tomcat container.
Hibernate DataSource JNDI Example Database Setup
I am using MySQL for my example, below script is executed to create a simple table and insert some values into it.
employee.sql
CREATE TABLE `Employee` (
  `id` int(11) unsigned NOT NULL AUTO_INCREMENT,
  `name` varchar(20) DEFAULT NULL,
  `role` varchar(20) DEFAULT NULL,
  `insert_time` datetime DEFAULT NULL,
  PRIMARY KEY (`id`)
) ENGINE=InnoDB AUTO_INCREMENT=26 DEFAULT CHARSET=utf8;

INSERT INTO `Employee` (`id`, `name`, `role`, `insert_time`)
VALUES
	(3, 'Pankaj', 'CEO', now());
INSERT INTO `Employee` (`id`, `name`, `role`, `insert_time`)
VALUES
	(14, 'David', 'Developer', now());
The Database schema name is TestDB.
Matching infrastructure at centron
Java applications in continuous operation: ccloud³ VMs from €3.12 per month with full root access, billed by the hour. Rent a cloud server →
Tomcat JNDI DataSource Configuration
For configuring tomcat container to initialize DataSource, we need to make some changes in tomcat server.xml and context.xml files.
server.xml
<Resource name="jdbc/MyLocalDB"
      global="jdbc/MyLocalDB"
      auth="Container"
      type="javax.sql.DataSource"
      driverClassName="com.mysql.jdbc.Driver"
      url="jdbc:mysql://localhost:3306/TestDB"
      username="pankaj"
      password="pankaj123"

      maxActive="100"
      maxIdle="20"
      minIdle="5"
      maxWait="10000"/>
Add above resource in the server.xml GlobalNamingResources element.
context.xml
<ResourceLink name="jdbc/MyLocalDB"
              global="jdbc/MyLocalDB"
              auth="Container"
              type="javax.sql.DataSource" />
Add above ResourceLink in the context.xml file, it’s required so that applications can access the JNDI resource with name jdbc/MyLocalDB. Just restart the server, you should not see any errors in the tomcat server logs. If there are any wrong configurations, such as password is wrong, you will get the corresponding exception in the server log. You also need to make sure that MySQL driver jar file is inside the tomcat lib directory, otherwise tomcat will not be able to create database connection and you will get ClassNotFoundException in logs. Now our database and tomcat server JNDI setup is ready, let’s move to create our web application using hibernate.
Hibernate DataSource Example Dynamic Web Project
Create a dynamic web project in Eclipse and then configure it as Maven project. Our final project structure will look like below image.
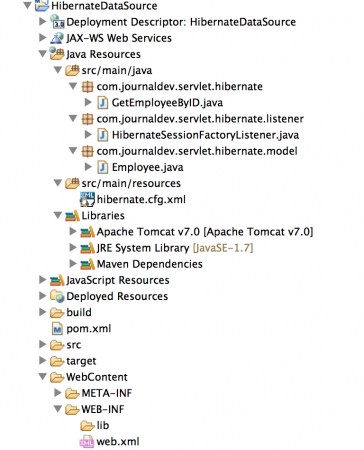
Note that I am using Tomcat-7 for my project deployment and I have added it to the build path, so that we don’t need to separately add Servlet API dependencies in our project. Tomcat-7 supports Servlet 3 specs and we will be using annotations to create our servlets. If you are not familiar with Servlet 3 annotations, you should check out Servlet Tutorial for Beginners. Let’s look into each of the components one by one.
Hibernate Maven Dependencies
Our final pom.xml file looks like below.
<project xmlns="https://maven.apache.org/POM/4.0.0" xmlns:xsi="https://www.w3.org/2001/XMLSchema-instance"
	xsi:schemaLocation="https://maven.apache.org/POM/4.0.0 https://maven.apache.org/xsd/maven-4.0.0.xsd">
	<modelVersion>4.0.0</modelVersion>
	<groupId>HibernateDataSource</groupId>
	<artifactId>HibernateDataSource</artifactId>
	<version>0.0.1-SNAPSHOT</version>
	<packaging>war</packaging>

	<dependencies>
		<dependency>
			<groupId>org.hibernate</groupId>
			<artifactId>hibernate-core</artifactId>
			<version>4.3.5.Final</version>
		</dependency>
		<dependency>
			<groupId>mysql</groupId>
			<artifactId>mysql-connector-java</artifactId>
			<version>5.0.5</version>
			<scope>provided</scope>
		</dependency>
	</dependencies>
	<build>
		<plugins>
			<plugin>
				<artifactId>maven-war-plugin</artifactId>
				<version>2.3</version>
				<configuration>
					<warSourceDirectory>WebContent</warSourceDirectory>
					<failOnMissingWebXml>false</failOnMissingWebXml>
				</configuration>
			</plugin>
			<plugin>
				<artifactId>maven-compiler-plugin</artifactId>
				<version>3.1</version>
				<configuration>
					<source>1.7</source>
					<target>1.7</target>
				</configuration>
			</plugin>
		</plugins>
		<finalName>${project.artifactId}</finalName>
	</build>
</project>
I am using Hibernate latest version 4.3.5.Final, hibernate-core dependency is added for Hibernate. mysql-connector-java dependency is added because we are using MySQL database, although scope is provided because it’s already part of the tomcat container libraries. Even if we don’t add MySQL driver dependencies, our project will compile and run fine. However it’s better to include it so that if someone will look into the project dependencies, it will be clear that we are using MySQL database.
Hibernate DataSource Configuration
Our hibernate configuration file with datasource looks like below.
hibernate.cfg.xml
<?xml version="1.0" encoding="UTF-8"?>
<!DOCTYPE hibernate-configuration PUBLIC
		"-//Hibernate/Hibernate Configuration DTD 3.0//EN"
		"https://hibernate.org/dtd/hibernate-configuration-3.0.dtd">
<hibernate-configuration>
    <session-factory>
        <property name="hibernate.connection.driver_class">com.mysql.jdbc.Driver</property>
        <property name="hibernate.dialect">org.hibernate.dialect.MySQLDialect</property>
        <property name="hibernate.connection.datasource">java:comp/env/jdbc/MyLocalDB</property>
        <property name="hibernate.current_session_context_class">thread</property>

        <!-- Mapping with model class containing annotations -->
	<mapping/>
    </session-factory>
</hibernate-configuration>
hibernate.connection.datasource property is used to provide the DataSource name that will be used by Hibernate for database operations.
Hibernate DataSource Example Model Class
As you can see in hibernate configuration file, we are using annotations in our model class Employee. Our model bean looks like below.
Employee.java
package com.journaldev.servlet.hibernate.model;

import java.util.Date;

import javax.persistence.Column;
import javax.persistence.Entity;
import javax.persistence.GeneratedValue;
import javax.persistence.GenerationType;
import javax.persistence.Id;
import javax.persistence.Table;
import javax.persistence.UniqueConstraint;

@Entity
@Table(name="Employee",
	   uniqueConstraints={@UniqueConstraint(columnNames={"ID"})})
public class Employee {

	@Id
	@GeneratedValue(strategy=GenerationType.IDENTITY)
	@Column(name="ID", nullable=false, unique=true, length=11)
	private int id;

	@Column(name="NAME", length=20, nullable=true)
	private String name;

	@Column(name="ROLE", length=20, nullable=true)
	private String role;

	@Column(name="insert_time", nullable=true)
	private Date insertTime;

	public int getId() {
		return id;
	}
	public void setId(int id) {
		this.id = id;
	}
	public String getName() {
		return name;
	}
	public void setName(String name) {
		this.name = name;
	}
	public String getRole() {
		return role;
	}
	public void setRole(String role) {
		this.role = role;
	}
	public Date getInsertTime() {
		return insertTime;
	}
	public void setInsertTime(Date insertTime) {
		this.insertTime = insertTime;
	}
}
Hibernate DataSource Tomcat JNDI Servlet Listener
Since we have to initialize Hibernate SessionFactory because we can use it in the application and also when web application is destroyed, we need to destroy SessionFactory. So the best place to do this in a ServletContextListener implementation.
HibernateSessionFactoryListener.java
package com.journaldev.servlet.hibernate.listener;

import javax.servlet.ServletContextEvent;
import javax.servlet.ServletContextListener;
import javax.servlet.annotation.WebListener;

import org.hibernate.SessionFactory;
import org.hibernate.boot.registry.StandardServiceRegistryBuilder;
import org.hibernate.cfg.Configuration;
import org.hibernate.service.ServiceRegistry;
import org.jboss.logging.Logger;

@WebListener
public class HibernateSessionFactoryListener implements ServletContextListener {

	public final Logger logger = Logger.getLogger(HibernateSessionFactoryListener.class);

    public void contextDestroyed(ServletContextEvent servletContextEvent) {
    	SessionFactory sessionFactory = (SessionFactory) servletContextEvent.getServletContext().getAttribute("SessionFactory");
    	if(sessionFactory != null && !sessionFactory.isClosed()){
    		logger.info("Closing sessionFactory");
    		sessionFactory.close();
    	}
    	logger.info("Released Hibernate sessionFactory resource");
    }

    public void contextInitialized(ServletContextEvent servletContextEvent) {
    	Configuration configuration = new Configuration();
    	configuration.configure("hibernate.cfg.xml");
    	logger.info("Hibernate Configuration created successfully");

    	ServiceRegistry serviceRegistry = new StandardServiceRegistryBuilder().applySettings(configuration.getProperties()).build();
    	logger.info("ServiceRegistry created successfully");
    	SessionFactory sessionFactory = configuration
				.buildSessionFactory(serviceRegistry);
    	logger.info("SessionFactory created successfully");

    	servletContextEvent.getServletContext().setAttribute("SessionFactory", sessionFactory);
    	logger.info("Hibernate SessionFactory Configured successfully");
    }

}
Hibernate Tomcat JNDI Example Servlet Implementation
Let’s write a simple servlet where we will pass employee id as request parameter and it will print out the employee information from database, obviously we will use Hibernate to query the database and get employee information.
GetEmployeeByID.java
package com.journaldev.servlet.hibernate;

import java.io.IOException;
import java.io.PrintWriter;

import javax.servlet.ServletException;
import javax.servlet.annotation.WebServlet;
import javax.servlet.http.HttpServlet;
import javax.servlet.http.HttpServletRequest;
import javax.servlet.http.HttpServletResponse;

import org.hibernate.Session;
import org.hibernate.SessionFactory;
import org.hibernate.Transaction;
import org.jboss.logging.Logger;

import com.journaldev.servlet.hibernate.model.Employee;

@WebServlet("/GetEmployeeByID")
public class GetEmployeeByID extends HttpServlet {
	private static final long serialVersionUID = 1L;

	public final Logger logger = Logger.getLogger(GetEmployeeByID.class);

	protected void doGet(HttpServletRequest request, HttpServletResponse response) throws ServletException, IOException {
		int empId = Integer.parseInt(request.getParameter("empId"));
		logger.info("Request Param empId="+empId);

		SessionFactory sessionFactory = (SessionFactory) request.getServletContext().getAttribute("SessionFactory");

		Session session = sessionFactory.getCurrentSession();
		Transaction tx = session.beginTransaction();
		Employee emp = (Employee) session.get(Employee.class, empId);
		tx.commit();
		PrintWriter out = response.getWriter();
        response.setContentType("text/html");
        if(emp != null){
        out.print("

Employee Details


");
out.print("


");
        out.print("
Employee ID
");
        out.print("
Employee Name
");
        out.print("
Employee Role
");

            out.print("
");
            out.print("

");
            out.print("

");
            out.print("

");
            out.print("
");
        out.print("


" + empId + "
" + emp.getName() + "
" + emp.getRole() + "


");

        out.print("");
        }else{
        	out.print("
No Employee Found with ID="+empId+"

");
        }
	}
}
It’s a very simple servlet class, I am using @WebServlet annotation to provide the URI pattern for it.
Testing Hibernate DataSource Tomcat JNDI Example Application
Our application is ready now, just export as a WAR file and deploy it in the Tomcat container. Below are some of the screenshots when we invoke our application servlet.
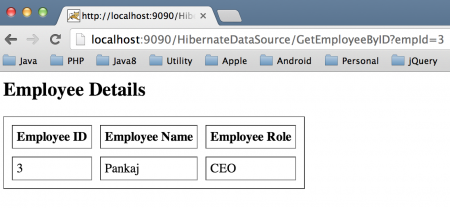
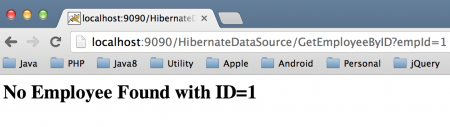
Notice that I am passing empId request parameter in the request URL query string. You will also see our application-generated logs in the server logs.
Application Logs
May 08, 2014 8:14:16 PM org.hibernate.cfg.Configuration configure
INFO: HHH000043: Configuring from resource: hibernate.cfg.xml
May 08, 2014 8:14:16 PM org.hibernate.cfg.Configuration getConfigurationInputStream
INFO: HHH000040: Configuration resource: hibernate.cfg.xml
May 08, 2014 8:14:16 PM org.hibernate.cfg.Configuration doConfigure
INFO: HHH000041: Configured SessionFactory: null
May 08, 2014 8:14:16 PM com.journaldev.servlet.hibernate.listener.HibernateSessionFactoryListener contextInitialized
INFO: Hibernate Configuration created successfully
May 08, 2014 8:14:16 PM com.journaldev.servlet.hibernate.listener.HibernateSessionFactoryListener contextInitialized
INFO: ServiceRegistry created successfully
May 08, 2014 8:14:16 PM org.hibernate.dialect.Dialect
INFO: HHH000400: Using dialect: org.hibernate.dialect.MySQLDialect
May 08, 2014 8:14:17 PM org.hibernate.engine.jdbc.internal.LobCreatorBuilder useContextualLobCreation
INFO: HHH000423: Disabling contextual LOB creation as JDBC driver reported JDBC version [3] less than 4
May 08, 2014 8:14:17 PM org.hibernate.engine.transaction.internal.TransactionFactoryInitiator initiateService
INFO: HHH000399: Using default transaction strategy (direct JDBC transactions)
May 08, 2014 8:14:17 PM org.hibernate.hql.internal.ast.ASTQueryTranslatorFactory
INFO: HHH000397: Using ASTQueryTranslatorFactory
May 08, 2014 8:14:17 PM com.journaldev.servlet.hibernate.listener.HibernateSessionFactoryListener contextInitialized
INFO: SessionFactory created successfully
May 08, 2014 8:14:17 PM com.journaldev.servlet.hibernate.listener.HibernateSessionFactoryListener contextInitialized
INFO: Hibernate SessionFactory Configured successfully
May 08, 2014 8:14:32 PM com.journaldev.servlet.hibernate.GetEmployeeByID doGet
INFO: Request Param empId=3
May 08, 2014 8:15:22 PM com.journaldev.servlet.hibernate.GetEmployeeByID doGet
INFO: Request Param empId=3
If you undeploy the application or stop the server, you will see server logs for destroying the SessionFactory.
SessionFactory Destroy Logs
May 08, 2014 11:31:16 PM com.journaldev.servlet.hibernate.listener.HibernateSessionFactoryListener contextDestroyed
INFO: Closing sessionFactory
May 08, 2014 11:31:16 PM com.journaldev.servlet.hibernate.listener.HibernateSessionFactoryListener contextDestroyed
INFO: Released Hibernate sessionFactory resource
That’s all for Hibernate DataSource example for Tomcat container, I hope it’s easy to understand and implement.
Conclusion
This tutorial demonstrated how to configure Hibernate with a JNDI DataSource in a Tomcat container. By setting up the database, configuring Tomcat, and integrating Hibernate, we created a simple, scalable web application. Proper configuration and debugging steps ensure seamless integration and smooth operation. Implementing these concepts allows you to leverage the power of Hibernate with robust database connectivity in a servlet environment.
Testen Sie Ihr Setup auf ccloud³
Registrieren Sie sich in der ccloud³ und erhalten Sie 200 € Startguthaben für Ihr Projekt – z. B. für eine PostgreSQL-VM mit automatischen Backups.