Spring Annotations allows us to configure dependencies and implement dependency injection through java programs.
Spring Annotations Overview
Spring framework implements and promotes the principle of control inversion (IOC) or dependency injection (DI) and is in fact an IOC container. Traditionally, Spring allows a developer to manage bean dependencies by using XML-based configuration. There is an alternative way to define beans and their dependencies. This method is a Java-based configuration. Unlike the XML approach, Java-based configuration allows you to manage bean components programmatically. That’s why Spring annotations were introduced. In this article we will explore most commonly used Spring Annotations and also look at some example program.
Matching infrastructure at centron
No hardware needed to follow along: ccloud³ VMs with full root access start at €3.12 per month, billed by the hour and ready in seconds. Rent a cloud server →
Spring Annotations List
Some of the spring core framework annotations are:
@Configuration
Used to indicate that a class declares one or more @Bean methods. These classes are processed by the Spring container to generate bean definitions and service requests for those beans at runtime.
@Bean
Indicates that a method produces a bean to be managed by the Spring container. This is one of the most used and important spring annotation. @Bean annotation also can be used with parameters like name, initMethod and destroyMethod.
- name – allows you give name for bean
- initMethod – allows you to choose method which will be invoked on context register
- destroyMethod – allows you to choose method which will be invoked on context shutdown
For example:
@Configuration
public class AppConfig {

    @Bean(name = "comp", initMethod = "turnOn", destroyMethod = "turnOff")
    Computer computer(){
        return new Computer();
    }
}
public class Computer {

    public void turnOn(){
        System.out.println("Load operating system");
    }
    public void turnOff(){
        System.out.println("Close all programs");
    }
}
@PreDestroy and @PostConstruct are alternative way for bean initMethod and destroyMethod. It can be used when the bean class is defined by us. For example;
 public class Computer {

    @PostConstruct
    public void turnOn(){
        System.out.println("Load operating system");
    }

    @PreDestroy
    public void turnOff(){
        System.out.println("Close all programs");
    }
}
@ComponentScan
Configures component scanning directives for use with @Configuration classes. Here we can specify the base packages to scan for spring components.
@Component
Indicates that an annotated class is a “component”. Such classes are considered as candidates for auto-detection when using annotation-based configuration and classpath scanning.
@PropertySource
Provides a simple declarative mechanism for adding a property source to Spring’s Environment. There is a similar annotation for adding an array of property source files i.e @PropertySources.
@Service
Indicates that an annotated class is a “Service”. This annotation serves as a specialization of @Component, allowing for implementation classes to be autodetected through classpath scanning.
@Repository
Indicates that an annotated class is a “Repository”. This annotation serves as a specialization of @Component and advisable to use with DAO classes.
@Autowired
Spring @Autowired annotation is used for automatic injection of beans. Spring @Qualifier annotation is used in conjunction with Autowired to avoid confusion when we have two of more bean configured for same type.
Spring MVC Annotations
Some of the important Spring MVC annotations are:
- @Controller
- @RequestMapping
- @PathVariable
- @RequestParam
- @ModelAttribute
- @RequestBody and @ResponseBody
- @RequestHeader and @ResponseHeader
You can learn more about them at Spring MVC Tutorial.
Spring Transaction Management Annotations
@Transactional is the spring declarative transaction management annotation, read more at Spring MVC Hibernate.
Spring Security Annotations
@EnableWebSecurity is used with @Configuration class to have the Spring Security configuration defined, read more at Spring Security Example.
Spring Boot Annotations
@SpringBootApplication
@EnableAutoConfiguration
Read more at Spring Boot Example.
Spring Annotations Example
Let’s look at a simple example where we will use Spring annotations in our application. Below image illustrates my Spring Annotations Example project.
Spring Framework Dependencies
I have created the maven project and added Spring Core Framework dependencies.
<project xmlns="https://maven.apache.org/POM/4.0.0" xmlns:xsi="https://www.w3.org/2001/XMLSchema-instance"
    xsi:schemaLocation="https://maven.apache.org/POM/4.0.0 https://maven.apache.org/xsd/maven-4.0.0.xsd">
        <modelVersion>4.0.0</modelVersion>
        <groupId>com.journaldev.spring</groupId>
        <artifactId>spring-annotations</artifactId>
        <version>0.0.1-SNAPSHOT</version>
        <name>Spring Annotations</name>

        <properties>
            <spring.framework>4.3.0.RELEASE</spring.framework>
        </properties>

        <dependencies>
            <dependency>
                <groupId>org.springframework</groupId>
                <artifactId>spring-context</artifactId>
                <version>${spring.framework}</version>
            </dependency>
            <dependency>
                <groupId>org.springframework</groupId>
                <artifactId>spring-core</artifactId>
                <version>${spring.framework}</version>
            </dependency>

        </dependencies>

    </project>
This will pull up all the spring core jars for our project.
Component Classes
Next step is to create component classes. Here I am imitating multiple database components, one for MySQL and another for Oracle.
DataBaseDriver is the base interface that we will implement.
package com.journaldev.drivers;

public interface DataBaseDriver {
    public String getInfo();
}
DataBaseDriver is the base interface that we will implement.
package com.journaldev.drivers;

import org.springframework.beans.factory.annotation.Value;
import org.springframework.context.annotation.PropertySource;
import org.springframework.stereotype.Component;

@Component
@PropertySource("classpath:mysqldatabase.properties")
public class MySqlDriver implements DataBaseDriver {

    @Value("${databaseName}")
    private String databaseName;
    @Value("${disableStatementPooling}")
    private String disableStatementPooling;

    public String getInfo() {
        return "[ Driver: mySql" +
                ", databaseName: " + databaseName +
                ", disableStatementPooling: " + disableStatementPooling +
                " ]";
    }
}
Notice the use of @Component annotation to indicate spring framework to treat this class as a Component. We are also using @PropertySource and @Value annotations, Spring will use these at runtime to inject and set these variable values from specified property file. Below is the properties declared in mysqldatabase.properties file.
databaseName=school
disableStatementPooling=truepackage com.journaldev.drivers;
public class OracleDriver implements DataBaseDriver {
protected String url;
protected String user;
protected String password;
protected String driver;
protected Integer port;
public String getUrl() {
return url;
}
public String getUser() {
return user;
}
public void setUser(String user) {
this.user = user;
}
public String getPassword() {
return password;
}
public void setPassword(String password) {
this.password = password;
}
public String getDriver() {
return driver;
}
public void setDriver(String driver) {
this.driver = driver;
}
public Integer getPort() {
return port;
}
public void setPort(Integer port) {
this.port = port;
}
public void setUrl(String url) {
this.url = url;
}
public String getInfo() {
return "[ Driver: Oracle" +
", url: " + url +
", port; " + port +
", user: " + user +
", password: " + password +
", driver: " + driver +
" ] ";
}
}package com.journaldev.drivers;
public class OracleDriver implements DataBaseDriver {
protected String url;
protected String user;
protected String password;
protected String driver;
protected Integer port;
public String getUrl() {
return url;
}
public String getUser() {
return user;
}
public void setUser(String user) {
this.user = user;
}
public String getPassword() {
return password;
}
public void setPassword(String password) {
this.password = password;
}
public String getDriver() {
return driver;
}
public void setDriver(String driver) {
this.driver = driver;
}
public Integer getPort() {
return port;
}
public void setPort(Integer port) {
this.port = port;
}
public void setUrl(String url) {
this.url = url;
}
public String getInfo() {
return "[ Driver: Oracle" +
", url: " + url +
", port; " + port +
", user: " + user +
", password: " + password +
", driver: " + driver +
" ] ";
}
}OracleDriver is a simple bean, we will use service class to inject properties to this bean.
Spring Service Class
package com.journaldev.service;

import com.journaldev.drivers.DataBaseDriver;
import org.springframework.beans.factory.annotation.Autowired;
import org.springframework.beans.factory.annotation.Qualifier;
import org.springframework.stereotype.Service;

@Service
public class UserService {

    @Autowired
    @Qualifier("oracleDriver")
    private DataBaseDriver dataBaseDriver;

    public String getDriverInfo(){
        return dataBaseDriver.getInfo();
    }
}
Here we are using @Service annotation to indicate Spring framework to treat this as a Service class. Then we are using @Autowired and @Qualifier("oracleDriver") annotations to tell spring framework to inject bean named oracleDriver to class property dataBaseDriver. Note that we haven’t yet created this spring bean.
Spring Beans
Final step is to create our spring beans and configuration classes to glue everything together.
package com.journaldev.config;

import org.springframework.beans.factory.annotation.Autowired;
import org.springframework.context.annotation.Bean;
import org.springframework.context.annotation.ComponentScan;
import org.springframework.context.annotation.Configuration;
import org.springframework.context.annotation.PropertySource;
import org.springframework.core.env.Environment;

import com.journaldev.drivers.DataBaseDriver;
import com.journaldev.drivers.MySqlDriver;
import com.journaldev.drivers.OracleDriver;

@Configuration
@ComponentScan("com.journaldev")
@PropertySource("classpath:oracledatabase.properties")
public class AppConfig {

    @Autowired
    Environment environment;

    @Bean
    DataBaseDriver oracleDriver() {
        OracleDriver oracleDriver = new OracleDriver();
        oracleDriver.setDriver(environment.getProperty("db.driver"));
        oracleDriver.setUrl(environment.getProperty("db.url"));
        oracleDriver.setPort(Integer.parseInt(environment.getProperty("db.port")));
        oracleDriver.setUser(environment.getProperty("db.user"));
        oracleDriver.setPassword(environment.getProperty("db.password"));

        return oracleDriver;
    }

    @Bean
    DataBaseDriver mysqlDriver() {
        return new MySqlDriver();
    }
}
Notice the bean definition for oracleDriver. In this method, we are reading properties from oracledatabase.properties file that is being set to environment variable by Spring framework. Here is the properties defined in oracledatabase.properties file.
db.url=localhost
db.port=4444
db.user=vasiliy
db.password=yilisav
db.driver=driver_name
Our spring annotations example project is ready to test. As a summary, we performed following steps:
- Created maven project and added required spring dependencies.
- Created component classes and inject properties from a resource file into it’s variable.
- If we have a third party component, we can use Service class to inject dependencies into it. Just like we did for OracleDriver through UserService class.
- Finally, we created Configuration class to define spring beans and set the base package to scan for spring component classes and configure them.
Spring Annotations Example Testing
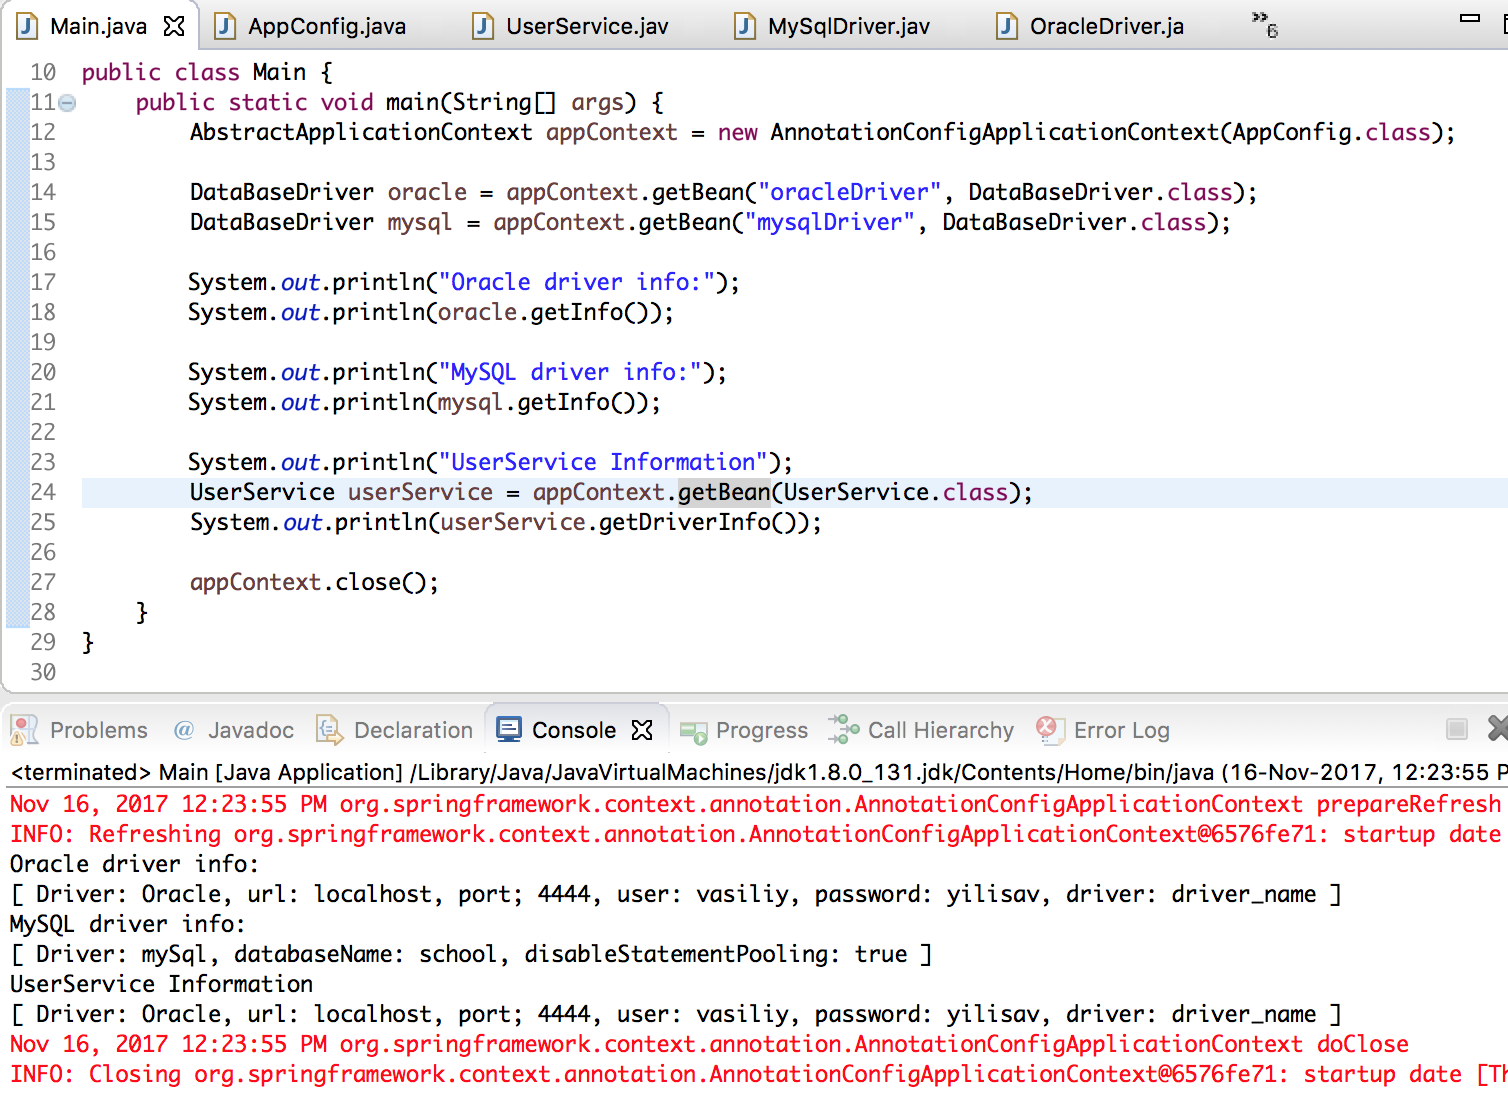
Here is our main class to test our Spring annotations example project.
package com.journaldev;

import org.springframework.context.annotation.AnnotationConfigApplicationContext;
import org.springframework.context.support.AbstractApplicationContext;

import com.journaldev.config.AppConfig;
import com.journaldev.drivers.DataBaseDriver;
import com.journaldev.service.UserService;

public class Main {
    public static void main(String[] args) {
        AbstractApplicationContext appContext = new AnnotationConfigApplicationContext(AppConfig.class);

        DataBaseDriver oracle = appContext.getBean("oracleDriver", DataBaseDriver.class);
        DataBaseDriver mysql = appContext.getBean("mysqlDriver", DataBaseDriver.class);

        System.out.println("Oracle driver info:");
        System.out.println(oracle.getInfo());

        System.out.println("MySQL driver info:");
        System.out.println(mysql.getInfo());
        System.out.println("UserService Information");
        UserService userService = appContext.getBean(UserService.class);
        System.out.println(userService.getDriverInfo());

        appContext.close();
    }
}
Below image shows the output produced. Notice that we haven’t configured any logging framework, so all the spring framework logging is getting printed into console in red color.
That’s all for a brief introduction for spring annotations. I have listed here most of the important annotations, but there are a lot more of them for specific tasks - A Comprehensive Guide
Testen Sie Ihr Setup auf ccloud³
Registrieren Sie sich in der ccloud³ und erhalten Sie 200 € Startguthaben für Ihr Projekt – z. B. für eine PostgreSQL-VM mit automatischen Backups.