In this post, we will setup up a sample Spring boot application and integrate it with Redis Cache. While Redis is an Open source in-memory data structure store, used as a database, cache and message broker, this lesson will demonstrate only the caching integration. We will make use of Spring Initializr tool for quickly setting up the project.
Spring Boot Redis Cache Project Setup
We will make use of Spring Initializr tool for quickly setting up the project. We will use 3 dependencies as shown below:
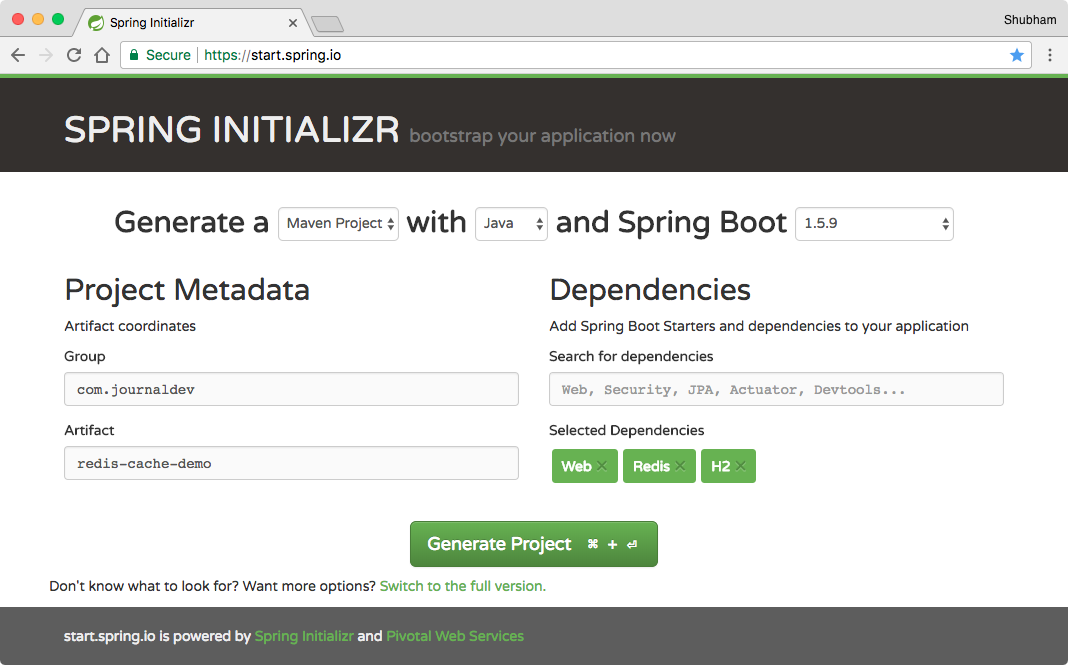 Download the project and unzip it. We have used H2 database dependency as we will be using an embedded database which loses all data once the application has been stopped.
Matching infrastructure at centron
No hardware needed to follow along: ccloud³ VMs with full root access start at €3.12 per month, billed by the hour and ready in seconds. Rent a cloud server →
Spring Boot Redis Cache Maven Dependencies
Though we already completed the setup with the tool, if you want to set it up manually, we use Maven build system for this project and here are the dependencies we used:
<parent>
    <groupId>org.springframework.boot</groupId>
    <artifactId>spring-boot-starter-parent</artifactId>
    <version>1.5.9.RELEASE</version>
    <relativePath/> <!-- lookup parent from repository -->
</parent>
<properties>
    <project.build.sourceEncoding>UTF-8</project.build.sourceEncoding>
    <project.reporting.outputEncoding>UTF-8</project.reporting.outputEncoding>
    <java.version>1.8</java.version>
</properties>
<dependencies>
    <dependency>
        <groupId>org.springframework.boot</groupId>
        <artifactId>spring-boot-starter-data-redis</artifactId>
    </dependency>
    <dependency>
        <groupId>org.springframework.boot</groupId>
        <artifactId>spring-boot-starter-web</artifactId>
    </dependency>
    <dependency>
        <groupId>org.springframework.boot</groupId>
        <artifactId>spring-boot-starter-test</artifactId>
        <scope>test</scope>
    </dependency>
    <!-- for JPA support -->
    <dependency>
        <groupId>org.springframework.boot</groupId>
        <artifactId>spring-boot-starter-data-jpa</artifactId>
    </dependency>
    <!-- for embedded database support -->
    <dependency>
        <groupId>com.h2database</groupId>
        <artifactId>h2</artifactId>
        <scope>runtime</scope>
    </dependency>
</dependencies>
<build>
    <plugins>
        <plugin>
            <groupId>org.springframework.boot</groupId>
            <artifactId>spring-boot-maven-plugin</artifactId>
        </plugin>
    </plugins>
</build>
Make sure to use stable version for Spring Boot from the maven central.
Defining the Model
To save an object into the Redis database, we define a Person model object with basic fields:
package com.journaldev.rediscachedemo;

import javax.persistence.*;
import java.io.Serializable;

@Entity
public class User implements Serializable {

    private static final long serialVersionUID = 7156526077883281623L;

    @Id
    @SequenceGenerator(name = "SEQ_GEN", sequenceName = "SEQ_USER", allocationSize = 1)
    @GeneratedValue(strategy = GenerationType.SEQUENCE, generator = "SEQ_GEN")
    private Long id;
    private String name;
    private long followers;

    public User() {
    }

    public User(String name, long followers) {
        this.name = name;
        this.followers = followers;
    }

    //standard getters and setters

    @Override
    public String toString() {
        return String.format("User{id=%d, name='%s', followers=%d}", id, name, followers);
    }
}
It is a standard POJO with getters and setters.
Configuring Redis Cache
With Spring Boot and the required dependency already in work with Maven, we can configure local Redis instance with only three lines in our application.properties file as:
# Redis Config
spring.cache.type=redis
spring.redis.host=localhost
spring.redis.port=6379
Also, use the @EnableCaching annotation on Spring Boot main class:
package com.journaldev.rediscachedemo;

import org.slf4j.Logger;
import org.slf4j.LoggerFactory;
import org.springframework.beans.factory.annotation.Autowired;
import org.springframework.boot.CommandLineRunner;
import org.springframework.boot.SpringApplication;
import org.springframework.boot.autoconfigure.SpringBootApplication;
import org.springframework.cache.annotation.EnableCaching;

@SpringBootApplication
@EnableCaching
public class Application implements CommandLineRunner {

    private final Logger LOG = LoggerFactory.getLogger(getClass());
    private final UserRepository userRepository;

    @Autowired
    public Application(UserRepository userRepository) {
        this.userRepository = userRepository;
    }

    public static void main(String[] args) {
        SpringApplication.run(Application.class, args);
    }

    @Override
    public void run(String... strings) {
        //Populating embedded database here
        LOG.info("Saving users. Current user count is {}.", userRepository.count());
        User shubham = new User("Shubham", 2000);
        User pankaj = new User("Pankaj", 29000);
        User lewis = new User("Lewis", 550);

        userRepository.save(shubham);
        userRepository.save(pankaj);
        userRepository.save(lewis);
        LOG.info("Done saving users. Data: {}.", userRepository.findAll());
    }
}
We have added a CommandLineRunner as we want to populate some sample data in the embedded H2 database.
Defining the Repository for our Spring Boot Redis Cache Project
Before we show how Redis works, we will just define a Repository for JPA related functionality:
package com.journaldev.rediscachedemo;

import org.springframework.data.jpa.repository.JpaRepository;
import org.springframework.stereotype.Repository;

@Repository
public interface UserRepository extends JpaRepository { }
It has no method calls as of now as we don’t need any.
Defining the Controller
Controllers are the place where Redis cache is called for action. Actually, this is the best place to do so because as a cache is directly associated with it, the request won’t even have to enter the service code to wait for cached results. Here is the controller skeleton:
package com.journaldev.rediscachedemo;

import org.slf4j.Logger;
import org.slf4j.LoggerFactory;
import org.springframework.beans.factory.annotation.Autowired;
import org.springframework.cache.annotation.CacheEvict;
import org.springframework.cache.annotation.CachePut;
import org.springframework.cache.annotation.Cacheable;
import org.springframework.web.bind.annotation.*;

@RestController
public class UserController {

    private final Logger LOG = LoggerFactory.getLogger(getClass());

    private final UserRepository userRepository;

    @Autowired
    public UserController(UserRepository userRepository) {
        this.userRepository = userRepository;
    }
    ...
}
Now, to put something into the cache, we use @Cacheable annotation:
@Cacheable(value = "users", key = "#userId", unless = "#result.followers < 12000")
@RequestMapping(value = "/{userId}", method = RequestMethod.GET)
public User getUser(@PathVariable String userId) {
    LOG.info("Getting user with ID {}.", userId);
    return userRepository.findOne(Long.valueOf(userId));
}
In the above mapping, getUser method will put a person into a cache named as ‘users’, identifies that person by the key as ‘userId’ and will only store a user with followers greater than 12000. This makes sure that cache is populated with users who are very popular and are often queried for. Also, we have intentionally added a log statement in the API call. Let’s make some API calls form Postman at this moment. These are the calls we made:
localhost:8090/1
localhost:8090/1
localhost:8090/2
localhost:8090/2
If we notice the logs, these will be it:
... : Getting user with ID 1.
... : Getting user with ID 1.
... : Getting user with ID 2.
Notice something? We made four API calls but only three log statements were present. This is because the User with ID 2 is having 29000 followers and so, it’s data was cached. This means that when an API call was made for it, the data was returned from the cache and no DB call was made for this!
Updating Cache
Cache values should also update whenever their actual objects value are updated. This can be done using @CachePut annotation:
@CachePut(value = "users", key = "#user.id")
@PutMapping("/update")
public User updatePersonByID(@RequestBody User user) {
    userRepository.save(user);
    return user;
}
With this, a person is again identified by his ID and is updated with the results.
Clearing Cache
If some data is to be deleted from actual Database, there won’t be a point to keep it in cache anymore. We can clear cache data using @CacheEvict annotation:
@CacheEvict(value = "users", allEntries=true)
@DeleteMapping("/{id}")
public void deleteUserByID(@PathVariable Long id) {
    LOG.info("deleting person with id {}", id);
    userRepository.delete(id);
}
In the last mapping, we just evicted cache entries and did nothing else.
Running Spring Boot Redis Cache Application
We can run this app simply by using a single command:
mvn spring-boot:runRedis Cache Limits
Although Redis is very fast, it still has no limits on storing any amount of data on a 64-bit system. It can only store 3GB of data on a 32-bit system. More available memory can result into a more hit ratio but this will tend to cease once too much memory is occupied by Redis. When cache size reaches the memory limit, old data is removed to make place for new one.
Summary of the Spring Boot Redis Cache Guide
In this lesson, we looked at what power Redis Cache provides us with fast data interaction and how we can integrate it with Spring Boot with minimal and yet powerful configuration. Integrating Redis Cache with Spring Boot Application
Testen Sie Ihr Setup auf ccloud³
Registrieren Sie sich in der ccloud³ und erhalten Sie 200 € Startguthaben für Ihr Projekt – z. B. für eine PostgreSQL-VM mit automatischen Backups.