Today we will learn about Spring File upload, specifically Spring MVC File Upload for single and multiple files.
Overview of Spring MVC File Upload
Spring MVC framework provides support for uploading files by integrating Apache Commons FileUpload API. The process to upload files is very easy and requires simple configurations.
We will create a simple Spring MVC project in STS that will look like below image.
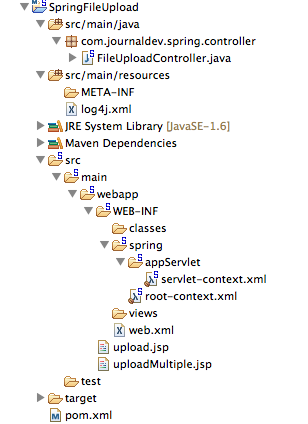
Most of the part is the boiler-plate code generated by STS tool, we will focus on the changes that are required to utilize Spring file upload integration.
Maven Dependencies for Apache Commons FileUpload
First of all, we need to add Apache Commons FileUpload dependencies in our pom.xml file, so that required jar files are part of the web application. Below is the dependency snippet from my pom.xml file.
<!-- Apache Commons FileUpload -->
<dependency>
	<groupId>commons-fileupload</groupId>
	<artifactId>commons-fileupload</artifactId>
	<version>1.3.1</version>
</dependency>

<!-- Apache Commons IO -->
<dependency>
	<groupId>commons-io</groupId>
	<artifactId>commons-io</artifactId>
	<version>2.4</version>
</dependency>
Spring File Upload Form Views
We will create two JSP pages to allow single and multiple file uploads in spring web application.
Single File Upload - upload.jsp View Code
<%@ taglib uri="https://java.sun.com/jsp/jstl/core" prefix="c" %>
<%@ page session="false" %>
<html>
<head>
<title>Upload File Request Page</title>
</head>
<body>
	<form method="POST" action="uploadFile" enctype="multipart/form-data">
		File to upload: <input type="file" name="file"><br />
		Name: <input type="text" name="name"><br /> <br />
		<input type="submit" value="Upload"> Press here to upload the file!
	</form>
</body>
</html>
Multiple File Upload - uploadMultiple.jsp View Code
<%@ taglib uri="https://java.sun.com/jsp/jstl/core" prefix="c" %>
<%@ page session="false" %>
<html>
<head>
<title>Upload Multiple File Request Page</title>
</head>
<body>
	<form method="POST" action="uploadMultipleFile" enctype="multipart/form-data">
		File1 to upload: <input type="file" name="file"><br />
		Name1: <input type="text" name="name"><br /> <br />
		File2 to upload: <input type="file" name="file"><br />
		Name2: <input type="text" name="name"><br /> <br />
		<input type="submit" value="Upload"> Press here to upload the file!
	</form>
</body>
</html>
Notice that these files are simple HTML files, I am not using any JSP or Spring tags to avoid complexity. The important point to note is that form enctype should be multipart/form-data, so that Spring web application knows that the request contains file data that needs to be processed. Also note that for multiple files, the form field “file” and “name” are the same in the input fields, so that the data will be sent in the form of an array. We will take the input array and parse the file data and store it in the given file name.
Spring MVC Multipart Configuration
To utilize Apache Commons FileUpload for handling multipart requests, all we need to do is configure multipartResolver bean with class as org.springframework.web.multipart.commons.CommonsMultipartResolver. Our final Spring configuration file looks like below.
Servlet-Context.xml Configuration
<?xml version="1.0" encoding="UTF-8"?>
<beans:beans xmlns="https://www.springframework.org/schema/mvc"
	xmlns:xsi="https://www.w3.org/2001/XMLSchema-instance" xmlns:beans="https://www.springframework.org/schema/beans"
	xmlns:context="https://www.springframework.org/schema/context"
	xsi:schemaLocation="https://www.springframework.org/schema/mvc https://www.springframework.org/schema/mvc/spring-mvc.xsd
		https://www.springframework.org/schema/beans https://www.springframework.org/schema/beans/spring-beans.xsd
		https://www.springframework.org/schema/context https://www.springframework.org/schema/context/spring-context.xsd">

	<!-- DispatcherServlet Context: defines this servlet's request-processing infrastructure -->

	<!-- Enables the Spring MVC @Controller programming model -->
	<annotation-driven />

	<!-- Handles HTTP GET requests for /resources/** by efficiently serving up static resources in the ${webappRoot}/resources directory -->
	<resources mapping="/**" location="/" />

	<!-- Resolves views selected for rendering by @Controllers to .jsp resources in the /WEB-INF/views directory -->
	<beans:bean>
		<beans:property name="prefix" value="/WEB-INF/views/" />
		<beans:property name="suffix" value=".jsp" />
	</beans:bean>

	<beans:bean>

		 <!-- setting maximum upload size -->
		<beans:property name="maxUploadSize" value="100000" />

	</beans:bean>

	<context:component-scan base-package="com.journaldev.spring.controller" />

</beans:beans>
Notice that I am setting maximum upload size limit by providing the maxUploadSize property value for multipartResolver bean. If you look into the source code of DispatcherServlet class, you will see that a MultipartResolver variable with name multipartResolver is defined and initialized in below method.
private void initMultipartResolver(ApplicationContext context)
  {
    try
    {
      this.multipartResolver = ((MultipartResolver)context.getBean("multipartResolver", MultipartResolver.class));
      if (this.logger.isDebugEnabled()) {
        this.logger.debug("Using MultipartResolver [" + this.multipartResolver + "]");
      }
    }
    catch (NoSuchBeanDefinitionException ex)
    {
      this.multipartResolver = null;
      if (this.logger.isDebugEnabled())
        this.logger.debug("Unable to locate MultipartResolver with name 'multipartResolver': no multipart request handling provided");
    }
  }
With this configuration, any request with enctype as multipart/form-data will be handled by multipartResolver before passing on to the Controller class.
Spring File Upload Controller Class
Controller class code is very simple, we need to define handler methods for the uploadFile and uploadMultipleFile URIs.
package com.journaldev.spring.controller;

import java.io.BufferedOutputStream;
import java.io.File;
import java.io.FileOutputStream;

import org.slf4j.Logger;
import org.slf4j.LoggerFactory;
import org.springframework.stereotype.Controller;
import org.springframework.web.bind.annotation.RequestMapping;
import org.springframework.web.bind.annotation.RequestMethod;
import org.springframework.web.bind.annotation.RequestParam;
import org.springframework.web.bind.annotation.ResponseBody;
import org.springframework.web.multipart.MultipartFile;

/**
 * Handles requests for the application file upload requests
 */
@Controller
public class FileUploadController {

	private static final Logger logger = LoggerFactory
			.getLogger(FileUploadController.class);

	/**
	 * Upload single file using Spring Controller
	 */
	@RequestMapping(value = "/uploadFile", method = RequestMethod.POST)
	public @ResponseBody
	String uploadFileHandler(@RequestParam("name") String name,
			@RequestParam("file") MultipartFile file) {

		if (!file.isEmpty()) {
			try {
				byte[] bytes = file.getBytes();

				// Creating the directory to store file
				String rootPath = System.getProperty("catalina.home");
				File dir = new File(rootPath + File.separator + "tmpFiles");
				if (!dir.exists())
					dir.mkdirs();

				// Create the file on server
				File serverFile = new File(dir.getAbsolutePath()
						+ File.separator + name);
				BufferedOutputStream stream = new BufferedOutputStream(
						new FileOutputStream(serverFile));
				stream.write(bytes);
				stream.close();

				logger.info("Server File Location="
						+ serverFile.getAbsolutePath());

				return "You successfully uploaded file=" + name;
			} catch (Exception e) {
				return "You failed to upload " + name + " => " + e.getMessage();
			}
		} else {
			return "You failed to upload " + name
					+ " because the file was empty.";
		}
	}

	/**
	 * Upload multiple file using Spring Controller
	 */
	@RequestMapping(value = "/uploadMultipleFile", method = RequestMethod.POST)
	public @ResponseBody
	String uploadMultipleFileHandler(@RequestParam("name") String[] names,
			@RequestParam("file") MultipartFile[] files) {

		if (files.length != names.length)
			return "Mandatory information missing";

		String message = "";
		for (int i = 0; i < files.length; i++) { MultipartFile file = files[i]; String name = names[i]; try { byte[] bytes = file.getBytes(); // Creating the directory to store file String rootPath = System.getProperty("catalina.home"); File dir = new File(rootPath + File.separator + "tmpFiles"); if (!dir.exists()) dir.mkdirs(); // Create the file on server File serverFile = new File(dir.getAbsolutePath() + File.separator + name); BufferedOutputStream stream = a BufferedOutputStream( new FileOutputStream(serverFile)); stream.write(bytes); stream.close(); logger.info("Server File Location=" + serverFile.getAbsolutePath()); message = message + "You successfully uploaded file=" + name + "<br />"; } catch (Exception e) { return "You failed to upload " + name + " => " + e.getMessage();
			}
		}
		return message;
	}
}
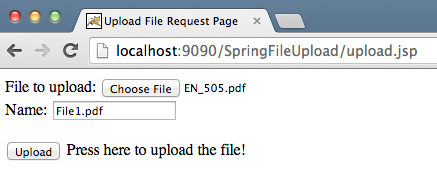
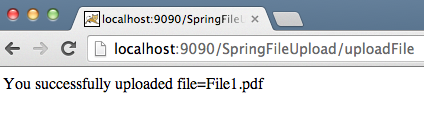
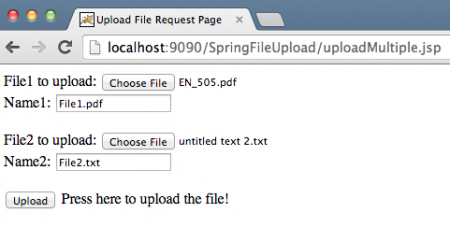
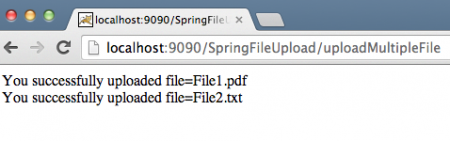
Notice the use of Spring annotations that make our life easier and code looks more readable. The uploadFileHandler method is used to handle single file upload scenario whereas the uploadMultipleFileHandler method is used to handle multiple files upload scenario. Actually, we could have a single method to handle both scenarios. Now export the application as a WAR file and deploy it into Tomcat servlet container. When we run our application, below images show us the request and responses.
Matching infrastructure at centron
Node applications need somewhere to run: ccloud³ VMs with full root access from €3.12 per month – or as a managed server if you would rather not run it yourself. Rent a cloud server →
Spring MVC File Upload Example
Testen Sie Ihr Setup auf ccloud³
Registrieren Sie sich in der ccloud³ und erhalten Sie 200 € Startguthaben für Ihr Projekt – z. B. für eine PostgreSQL-VM mit automatischen Backups.