Spring RestController annotation is a convenience annotation that is itself annotated with @Controller and @ResponseBody. This annotation is applied to a class to mark it as a request handler. Spring RestController annotation is used to create RESTful web services using Spring MVC. Spring RestController takes care of mapping request data to the defined request handler method. Once response body is generated from the handler method, it converts it to JSON or XML response.
Spring RestController Example
Let’s see how easily we can use RestController to create a REST web service in Spring. We will reuse the Spring Repository implementation and create a restful webservice. We will create a standalone Web application and not use Spring Boot here. We will also expose our APIs to support both JSON and XML in request and response. Below image shows our final project structure.
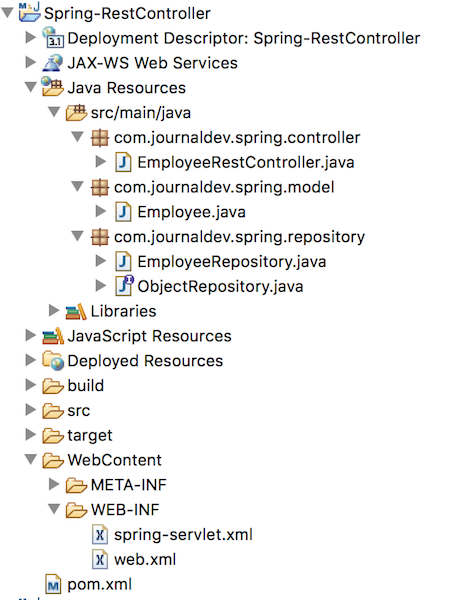
Model and Repository classes are already provided in the Spring Repository tutorial. We will focus more on RestController implementation here.
Spring RestController Maven Dependencies
Let’s have a look at the dependencies required to create our Spring RestController example project.
<dependency>
    <groupId>org.springframework</groupId>
    <artifactId>spring-webmvc</artifactId>
    <version>5.0.7.RELEASE</version>
</dependency>
<dependency>
    <groupId>org.springframework</groupId>
    <artifactId>spring-web</artifactId>
    <version>5.0.7.RELEASE</version>
</dependency>

<!-- Jackson for REST JSON Support -->
<dependency>
    <groupId>com.fasterxml.jackson.core</groupId>
    <artifactId>jackson-databind</artifactId>
    <version>2.9.6</version>
</dependency>
<!-- JAXB for XML Response, needed to explicitly define from Java 9 onwards -->
<dependency>
    <groupId>javax.xml.bind</groupId>
    <artifactId>jaxb-api</artifactId>
    <version>2.3.0</version>
</dependency>
<dependency>
    <groupId>org.glassfish.jaxb</groupId>
    <artifactId>jaxb-runtime</artifactId>
    <version>2.3.0</version>
    <scope>runtime</scope>
</dependency>
<dependency>
    <groupId>javax.activation</groupId>
    <artifactId>javax.activation-api</artifactId>
    <version>1.2.0</version>
</dependency>
We need Spring MVC, Jackson and JAXB libraries to support both XML and JSON requests and responses from our REST web service. Our web.xml file is used to configure Spring MVC DispatcherServlet as the front controller. Let’s look at the Spring Context file now.
<?xml version="1.0" encoding="UTF-8"?>
<beans:beans
    xmlns="https://www.springframework.org/schema/mvc"
    xmlns:xsi="https://www.w3.org/2001/XMLSchema-instance"
    xmlns:beans="https://www.springframework.org/schema/beans"
    xmlns:context="https://www.springframework.org/schema/context"
    xsi:schemaLocation="https://www.springframework.org/schema/mvc https://www.springframework.org/schema/mvc/spring-mvc.xsd
        https://www.springframework.org/schema/beans https://www.springframework.org/schema/beans/spring-beans.xsd
        https://www.springframework.org/schema/context https://www.springframework.org/schema/context/spring-context.xsd">

    <!-- Enables the Spring MVC @Controller programming model -->
    <annotation-driven />

    <context:component-scan
        base-package="com.journaldev.spring" />

    <beans:bean
        />
    <beans:bean
        />

    <beans:bean
       >
        <beans:property name="messageConverters">
            <beans:list>
                <beans:ref bean="jsonMessageConverter" />
                <beans:ref bean="xmlMessageConverter" />
            </beans:list>
        </beans:property>
    </beans:bean>

</beans:beans>
Most important part is the jsonMessageConverter and xmlMessageConverter beans defined and set in the RequestMappingHandlerAdapter messageConverters property. That’s all is needed to tell spring that we want our application to support both JSON and XML and these are the beans to be used for transformation.
Matching infrastructure at centron
Hardening does not stop at the server: cloud firewalls filter traffic before it reaches the VM – centrally managed, no per-rule surcharge. Explore cloud firewalls →
Spring RestController Class
Here is our Spring RestController class implementation.
package com.journaldev.spring.controller;

import java.util.List;

import org.springframework.beans.factory.annotation.Autowired;
import org.springframework.web.bind.annotation.DeleteMapping;
import org.springframework.web.bind.annotation.GetMapping;
import org.springframework.web.bind.annotation.PathVariable;
import org.springframework.web.bind.annotation.PostMapping;
import org.springframework.web.bind.annotation.RequestBody;
import org.springframework.web.bind.annotation.RestController;

import com.journaldev.spring.model.Employee;
import com.journaldev.spring.repository.EmployeeRepository;

@RestController
public class EmployeeRestController {

    @Autowired
    private EmployeeRepository repository;

    @GetMapping("/rest/employee/get/{id}")
    public Employee getEmployeeByID(@PathVariable("id") int id) {
        return repository.retrieve(id);
    }

    @GetMapping("/rest/employee/getAll")
    public List<Employee> getAllEmployees() {
        return repository.getAll();
    }

    @PostMapping("/rest/employee/create")
    public Employee createEmployee(@RequestBody Employee emp) {
        repository.store(emp);
        return emp;
    }

    @GetMapping("/rest/employee/search/{name}")
    public Employee getEmployeeByName(@PathVariable("name") String name) {
        return repository.search(name);
    }

    @DeleteMapping("/rest/employee/delete/{id}")
    public Employee deleteEmployeeByID(@PathVariable("id") int id) {
        return repository.delete(id);
    }
}
Notice that we have only defined our REST APIs here, all the business logic is part of Repository class...
Accept and Content-Type Request Headers
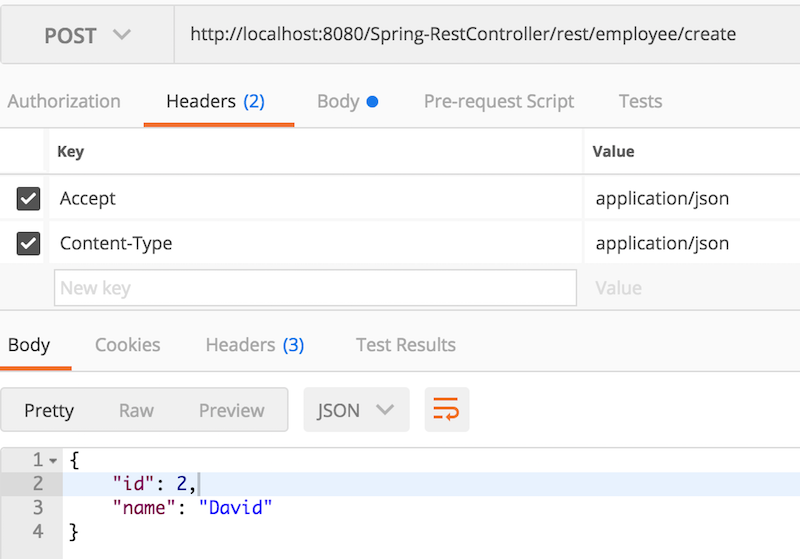
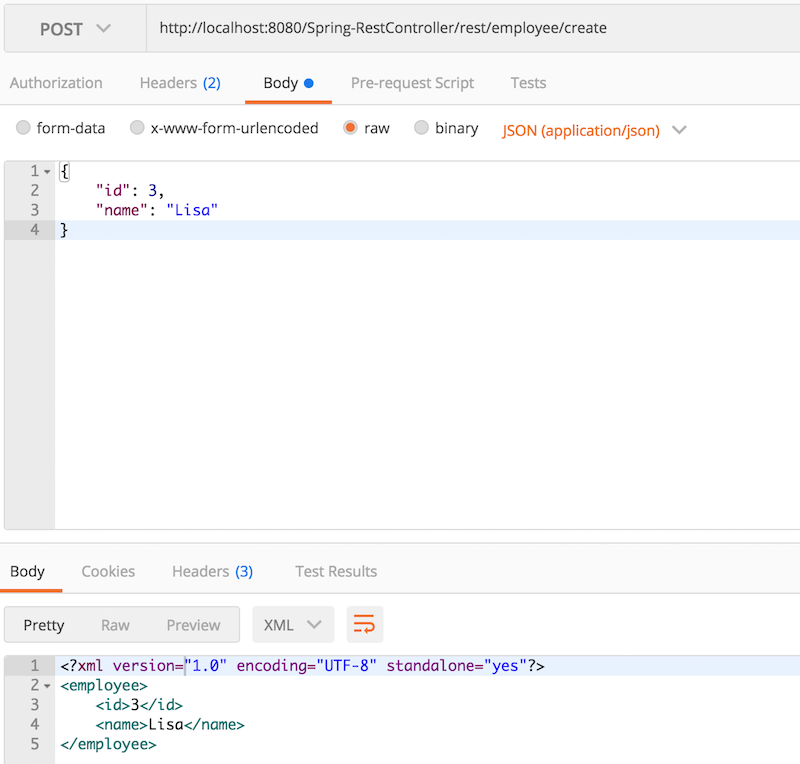
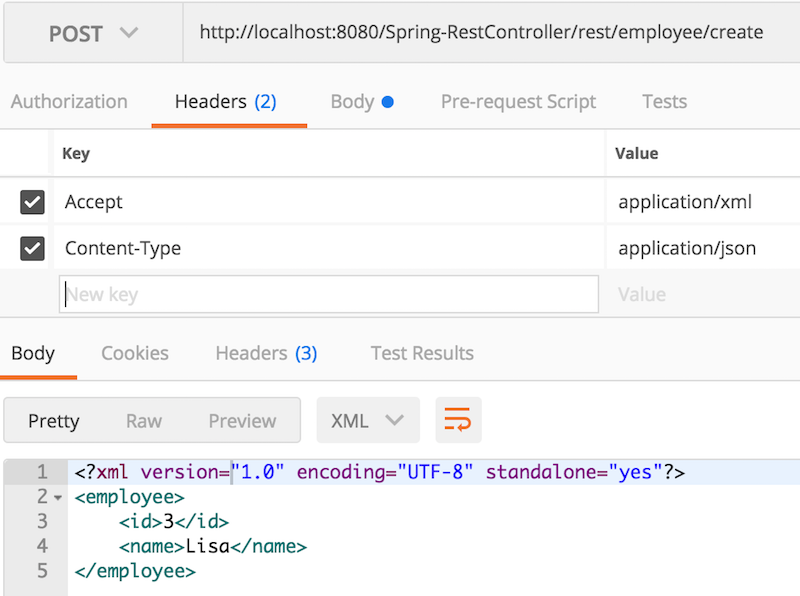
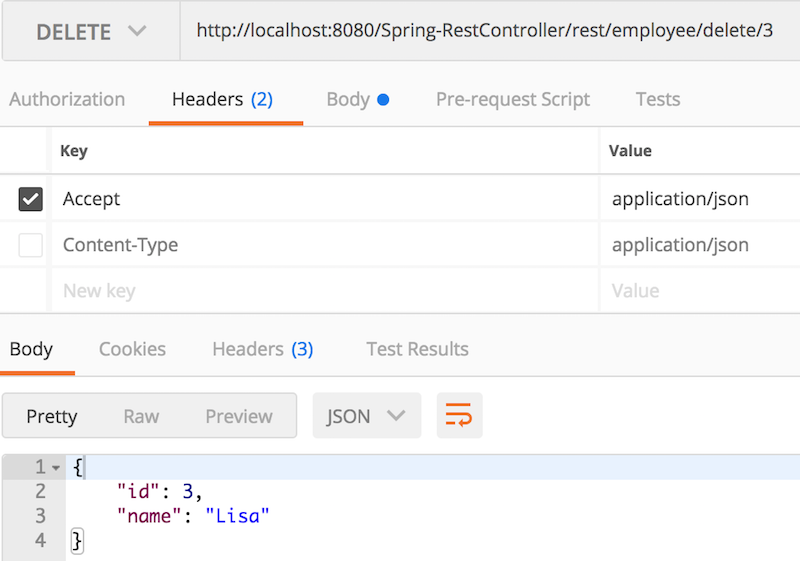
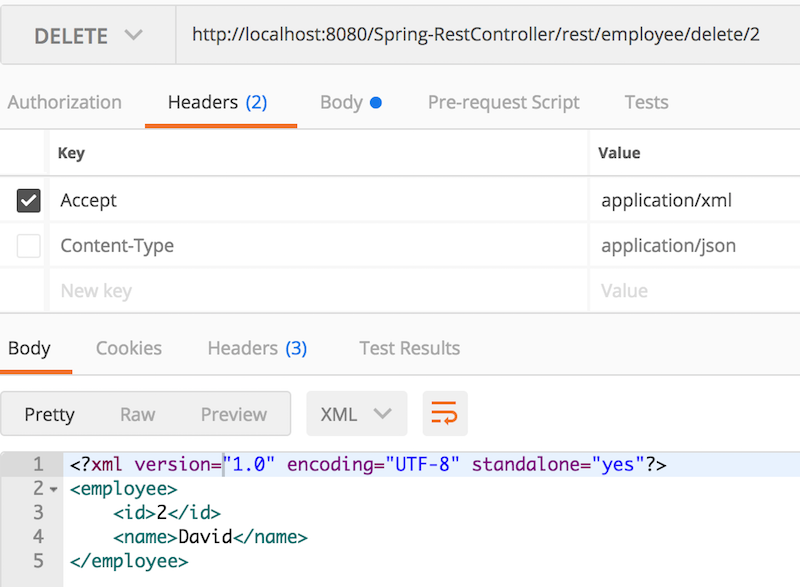
We have configured our REST application to work with both XML and JSON. So how it will know whether the request is XML or JSON, and if the response should be sent in JSON or XML format. This is where Accept and Content-Type Request Headers are used. Content-Type: Defined the type of content in request body, if its value is “application/xml” then Spring will treat request body as XML document. If its value is “application/json” then the request body is treated as JSON. Accept: Defined the type of content client is expecting as response. If its value is “application/xml” then XML response will be sent. If its value is “application/json” then JSON response will be sent.
Spring RestController Test
Our application is ready to be tested, I have deployed it on Tomcat-9 and testing with Postman. Below are the testing results with the explanation.
Spring RestController GET JSON Response
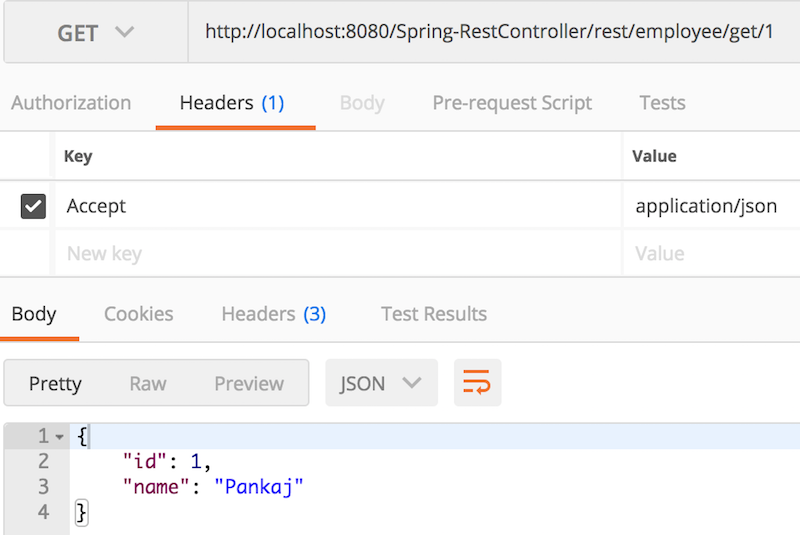
It’s a simple GET request, the important point to note is the value of “Accept” header.
Spring RestController GET XML Response
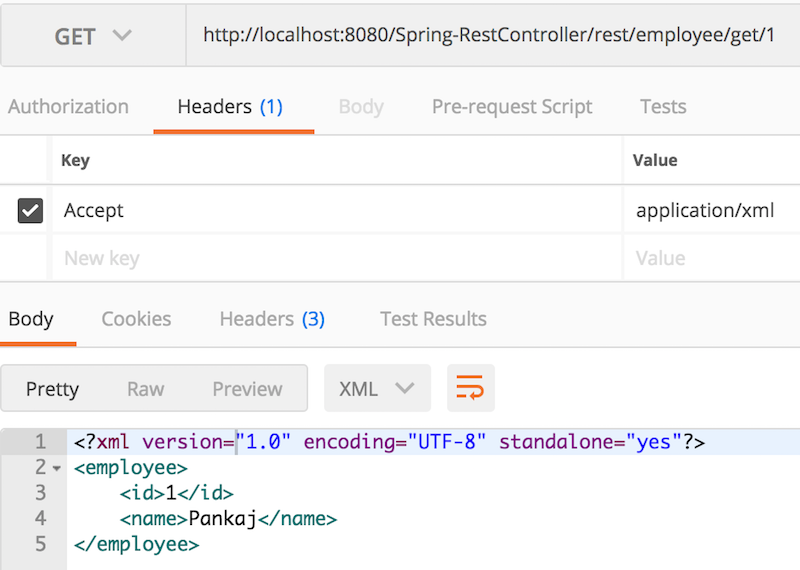
When we changed “Accept” header value to “application/xml”, we are getting XML response.
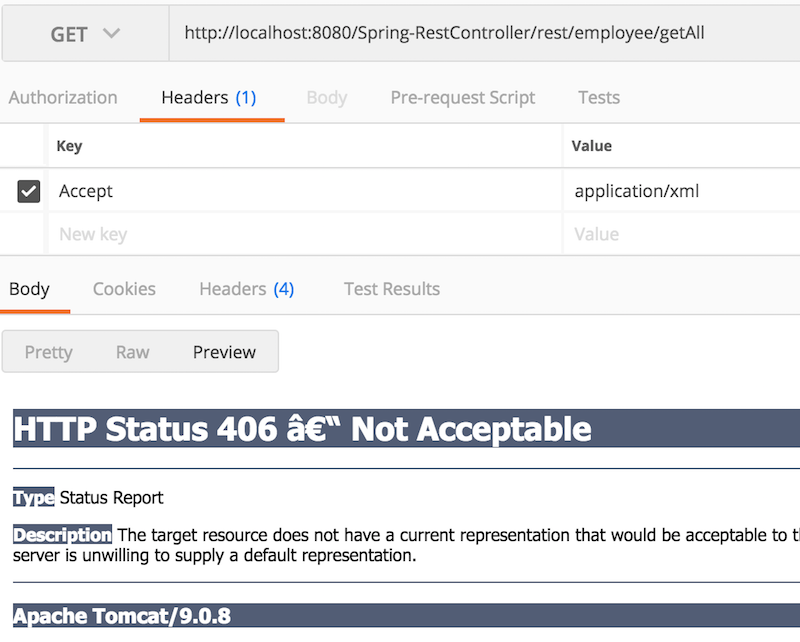
Spring RestController GET List
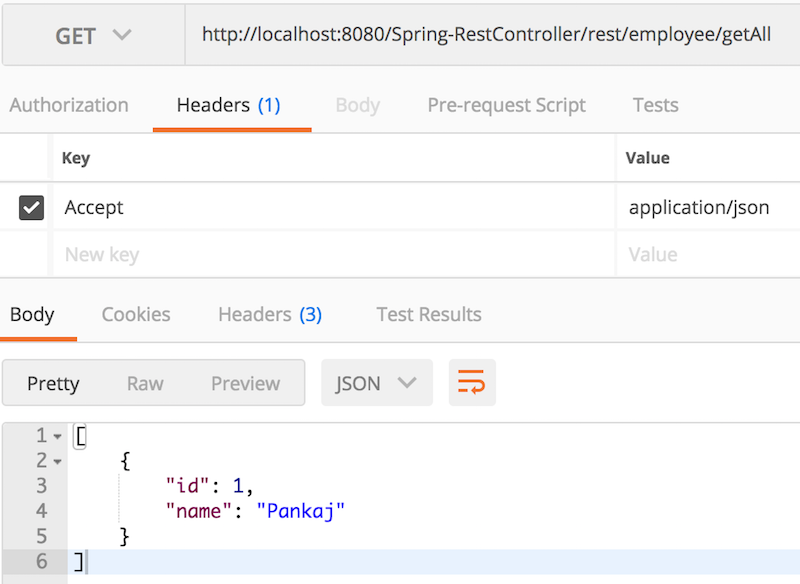
Let’s try to call the API to get list of employees. We are getting list of elements in JSON with anonymous root element. Since XML doesn’t support anonymous root element, we are getting an exception message.
Spring RestController POST
Spring RestController POST with JSON Request and Response
Spring RestController POST with JSON Request Body
Spring RestController POST with JSON Request and XML Response
Spring RestController DELETE
Summary
Spring RestController helps us in focusing on business logic by taking care of all the boiler-plate stuff for creating REST web services APIs.
Testen Sie Ihr Setup auf ccloud³
Registrieren Sie sich in der ccloud³ und erhalten Sie 200 € Startguthaben für Ihr Projekt – z. B. für eine PostgreSQL-VM mit automatischen Backups.