Spring @Service annotation is a specialization of @Component annotation. Spring Service annotation can be applied only to classes. It is used to mark the class as a service provider.
Spring @Service Annotation
Spring @Service annotation is used with classes that provide some business functionalities. Spring context will autodetect these classes when annotation-based configuration and classpath scanning is used.
Matching infrastructure at centron
No hardware needed to follow along: ccloud³ VMs with full root access start at €3.12 per month, billed by the hour and ready in seconds. Rent a cloud server →
Spring @Service Example
Let’s create a simple spring application where we will create a Spring service class. Create a simple maven project in Eclipse and add following spring core dependency.
<dependency>
    <groupId>org.springframework</groupId>
    <artifactId>spring-context</artifactId>
    <version>5.0.6.RELEASE</version>
</dependency>
Our final project structure will look like below image.
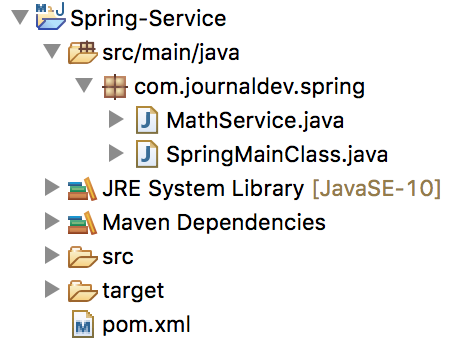
Let’s create a service class.
package com.journaldev.spring;

import org.springframework.stereotype.Service;

@Service("ms")
public class MathService {

    public int add(int x, int y) {
        return x + y;
    }

    public int subtract(int x, int y) {
        return x - y;
    }
}
Notice that it’s a simple java class that provides functionalities to add and subtract two integers. So we can call it a service provider. We have annotated it with @Service annotation so that spring context can autodetect it and we can get its instance from the context. Let’s create a main class where we will create the annotation-driven spring context get the instance of our service class.
package com.journaldev.spring;

import org.springframework.context.annotation.AnnotationConfigApplicationContext;

public class SpringMainClass {

    public static void main(String[] args) {
        AnnotationConfigApplicationContext context = new AnnotationConfigApplicationContext();
        context.scan("com.journaldev.spring");
        context.refresh();

        MathService ms = context.getBean(MathService.class);

        int add = ms.add(1, 2);
        System.out.println("Addition of 1 and 2 = " + add);

        int subtract = ms.subtract(2, 1);
        System.out.println("Subtraction of 2 and 1 = " + subtract);

        //close the spring context
        context.close();
    }

}
Just execute the class as a Java application, it will produce following output.
Jun 05, 2018 3:02:05 PM org.springframework.context.support.AbstractApplicationContext prepareRefresh INFO: Refreshing org.springframework.context.annotation.AnnotationConfigApplicationContext@ff5b51f: startup date [Tue Jun 05 15:02:05 IST 2018]; root of context hierarchy Addition of 1 and 2 = 3 Subtraction of 2 and 1 = 1 Jun 05, 2018 3:02:05 PM org.springframework.context.support.AbstractApplicationContext doClose INFO: Closing org.springframework.context.annotation.AnnotationConfigApplicationContext@ff5b51f: startup date [Tue Jun 05 15:02:05 IST 2018]; root of context hierarchy
If you notice our MathService class, we have defined the service name as “ms”. We can get the instance of MathService using this name too. The output will remain same in this case. However, we will have to use explicit casting.
MathService ms = (MathService) context.getBean("ms");That’s all for a quick example of Spring @Service annotation - A Comprehensive Guide.
Testen Sie Ihr Setup auf ccloud³
Registrieren Sie sich in der ccloud³ und erhalten Sie 200 € Startguthaben für Ihr Projekt – z. B. für eine PostgreSQL-VM mit automatischen Backups.