Since File Upload is a common task in web applications, Servlet Specs 3.0 provided additional support for uploading files to server and we don’t have to depend on any third party APIs for this. In this tutorial we will see how we can use Servlet 3.0 API for uploading Files to server.
MultipartConfig
We need to annotate File Upload handler servlet with MultipartConfig annotation to handle multipart/form-data requests that is used for uploading file to server. MultipartConfig annotation has following attributes:
- fileSizeThreshold: We can specify the size threshold after which the file will be written to disk. The size value is in bytes, so 1024*1024*10 is 10 MB.
- location: Directory where files will be stored by default, it’s default value is “”.
- maxFileSize: Maximum size allowed to upload a file, it’s value is provided in bytes. It’s default value is -1L means unlimited.
- maxRequestSize: Maximum size allowed for multipart/form-data request. Default value is -1L that means unlimited.
Matching infrastructure at centron
Node applications need somewhere to run: ccloud³ VMs with full root access from €3.11 per month – or as a managed server if you would rather not run it yourself. Rent a cloud server →
Part Interface
Part interface represents a part or form item that was received within a multipart/form-data POST request. Some important methods are getInputStream(), write(String fileName) that we can use to read and write file.
HttpServletRequest Changes
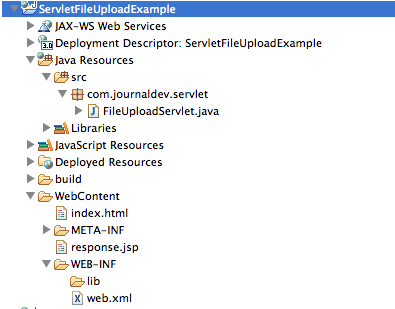
New methods got added in HttpServletRequest to get all the parts in multipart/form-data request through getParts() method. We can get a specific part using getPart(String partName) method. Let’s see a simple project where we will use above API methods to upload file using servlet. Our project structure will look like below image.
HTML Form
We have a simple html page where we can select the file to upload and submit request to server to get it uploaded. index.html
<html>
        <head></head>
        <body>
        <form action="FileUploadServlet" method="post" enctype="multipart/form-data">
        Select File to Upload:<input type="file" name="fileName">
        <br>
        <input type="submit" value="Upload">
        </form>
        </body>
        </html>
File Upload Servlet
Here is our File Upload Servlet implementation. FileUploadServlet.java
package com.journaldev.servlet;

import java.io.File;
import java.io.IOException;

import javax.servlet.ServletException;
import javax.servlet.annotation.MultipartConfig;
import javax.servlet.annotation.WebServlet;
import javax.servlet.http.HttpServlet;
import javax.servlet.http.HttpServletRequest;
import javax.servlet.http.HttpServletResponse;
import javax.servlet.http.Part;

@WebServlet("/FileUploadServlet")
@MultipartConfig(fileSizeThreshold=1024*1024*10, 	// 10 MB
                 maxFileSize=1024*1024*50,      	// 50 MB
                 maxRequestSize=1024*1024*100)   	// 100 MB
public class FileUploadServlet extends HttpServlet {

    private static final long serialVersionUID = 205242440643911308L;

    /**
     * Directory where uploaded files will be saved, its relative to
     * the web application directory.
     */
    private static final String UPLOAD_DIR = "uploads";

    protected void doPost(HttpServletRequest request,
            HttpServletResponse response) throws ServletException, IOException {
        // gets absolute path of the web application
        String applicationPath = request.getServletContext().getRealPath("");
        // constructs path of the directory to save uploaded file
        String uploadFilePath = applicationPath + File.separator + UPLOAD_DIR;

        // creates the save directory if it does not exists
        File fileSaveDir = new File(uploadFilePath);
        if (!fileSaveDir.exists()) {
            fileSaveDir.mkdirs();
        }
        System.out.println("Upload File Directory="+fileSaveDir.getAbsolutePath());

        String fileName = null;
        //Get all the parts from request and write it to the file on server
        for (Part part : request.getParts()) {
            fileName = getFileName(part);
            part.write(uploadFilePath + File.separator + fileName);
        }

        request.setAttribute("message", fileName + " File uploaded successfully!");
        getServletContext().getRequestDispatcher("/response.jsp").forward(
                request, response);
    }

    /**
     * Utility method to get file name from HTTP header content-disposition
     */
    private String getFileName(Part part) {
        String contentDisp = part.getHeader("content-disposition");
        System.out.println("content-disposition header= "+contentDisp);
        String[] tokens = contentDisp.split(";");
        for (String token : tokens) {
            if (token.trim().startsWith("filename")) {
                return token.substring(token.indexOf("=") + 2, token.length()-1);
            }
        }
        return "";
    }
}
Notice the use of @MultipartConfig annotation to specify different size parameters for upload file. We need to use request header “content-disposition” attribute to get the file name sent by client, we will save the file with same name. The directory location is relative to web application where I am saving the file, you can configure it to some other location like in Apache Commons FileUpload example.
Response JSP
A simple JSP page that will be sent as response to client once the file is uploaded successfully to server. response.jsp
<%@ page language="java" contentType="text/html; charset=ISO-8859-1"
       pageEncoding="ISO-8859-1"%>
       <!DOCTYPE html PUBLIC "-//W3C//DTD HTML 4.01 Transitional//EN"
       "https://www.w3.org/TR/html4/loose.dtd">
       <html>
       <head>
       <title>Upload File Response</title>
       </head>
       <body>
       <%-- Using JSP EL to get message attribute value from request scope --%>
       <h2>${requestScope.message}</h2>
       </body>
       </html>
Deployment Descriptor
There is nothing new in web.xml file for servlet file upload, it’s only used to make the index.html as welcome file. web.xml
<?xml version="1.0" encoding="UTF-8"?>
      <web-app xmlns:xsi="https://www.w3.org/2001/XMLSchema-instance" xmlns="https://java.sun.com/xml/ns/javaee" xsi:schemaLocation="https://java.sun.com/xml/ns/javaee https://java.sun.com/xml/ns/javaee/web-app_3_0.xsd" version="3.0">
        <display-name>ServletFileUploadExample</display-name>
        <welcome-file-list>
          <welcome-file>index.html</welcome-file>
        </welcome-file-list>
      </web-app>
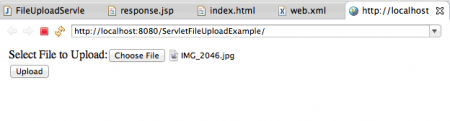
Now when we run the application, we get following pages as response.
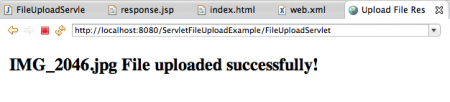
The logs will show the directory location where file is saved and content-disposition header information.
Upload File Directory=/Users/pankaj/Documents/workspace/j2ee/.metadata/.plugins/org.eclipse.wst.server.core/tmp0/wtpwebapps/ServletFileUploadExample/uploads
content-disposition header= form-data; name="fileName"; filename="IMG_2046.jpg"
I am running Tomcat through Eclipse, that’s why file location is like this. If you run tomcat through command line and deploy application by exporting as WAR file into webapps directory, you will get different structure but a clear one.
Test your setup on ccloud³
Sign up for ccloud³ and receive €200 starting credit for your project.