Spring @PropertySource annotation is used to provide properties file to Spring Environment. This annotation is used with @Configuration classes. Spring PropertySource annotation is repeatable, means you can have multiple PropertySource on a Configuration class. This feature is available if you are using Java 8 or higher version.
Spring PropertySource Example
Let’s quickly go through a simple spring application where we will read Database configuration details from the property file and create the database connection. We will print some metadata information of the database to console. Create a simple maven project and add Spring and MySQL dependencies. You can use any other database too for the example, just change the configurations accordingly.
<dependency>
	<groupId>org.springframework</groupId>
	<artifactId>spring-context</artifactId>
	<version>5.0.6.RELEASE</version>
</dependency>
<dependency>
	<groupId>mysql</groupId>
	<artifactId>mysql-connector-java</artifactId>
	<version>5.1.46</version>
</dependency>
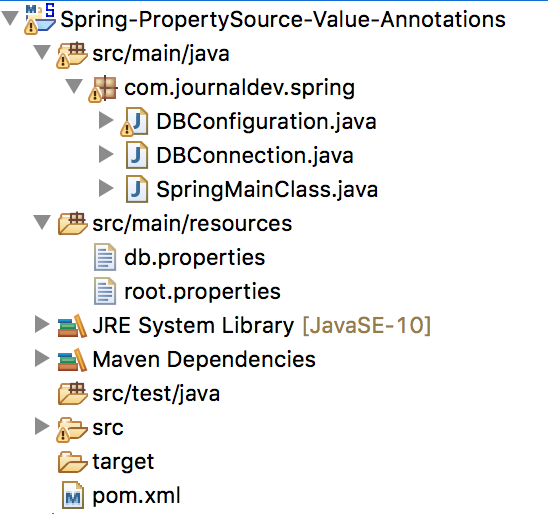
Below image shows our project final structure, we will go through all the important components one by one.
Here is our class to create the Database Connection.
package com.journaldev.spring;

import java.sql.Connection;
import java.sql.DriverManager;
import java.sql.SQLException;

public class DBConnection {

	private String driverClass;
	private String dbURL;
	private String userName;
	private char[] password;
	private Connection con;

	public DBConnection(String driverClass, String dbURL, String userName, char[] password) {
		this.driverClass = driverClass;
		this.dbURL = dbURL;
		this.userName = userName;
		this.password = password;
	}

	public Connection getConnection() {
		if (this.con != null)
			return con;

		Connection con = null;
		try {
			System.out.println("Creating DB Connection");
			Class.forName(driverClass);
			con = DriverManager.getConnection(dbURL, userName, String.valueOf(password));
			System.out.println("Successfully Created DB Connection");
		} catch (ClassNotFoundException | SQLException e) {
			e.printStackTrace();
		}
		this.con = con;
		return con;
	}

	public void close() {
		System.out.println("DBConnection close called");
		if (this.con != null) {
			try {
				con.close();
			} catch (SQLException e) {
				e.printStackTrace();
			}
		}
	}
}
NOTE: If you are creating a real-world application, you can use Spring ORM. This way spring will take care of database connection management and you can focus on writing business logic. Now let’s create the Spring Configuration class where we will use PropertySource annotation.
package com.journaldev.spring;

import org.springframework.beans.factory.annotation.Autowired;
import org.springframework.context.annotation.Bean;
import org.springframework.context.annotation.Configuration;
import org.springframework.context.annotation.PropertySource;
import org.springframework.core.env.Environment;

@Configuration
@PropertySource("classpath:db.properties")
@PropertySource("classpath:root.properties")
public class DBConfiguration {

	@Autowired
    Environment env;

	@Bean
    public DBConnection getDBConnection() {
		System.out.println("Getting DBConnection Bean for App: "+env.getProperty("APP_NAME"));
		DBConnection dbConnection = new DBConnection(env.getProperty("DB_DRIVER_CLASS"), env.getProperty("DB_URL"), env.getProperty("DB_USERNAME"), env.getProperty("DB_PASSWORD").toCharArray());
        return dbConnection;
    }

}
Notice that I am loading multiple properties files to the Spring environment. Let’s look at these property files content. db.properties
#MYSQL Database Configurations
DB_DRIVER_CLASS=com.mysql.jdbc.Driver
DB_URL=jdbc:mysql://localhost:3306/Test
DB_USERNAME=journaldev
DB_PASSWORD=journaldev
root.properties
APP_NAME=PropertySource ExampleLet’s create the main class and get database details.
package com.journaldev.spring;

import java.sql.Connection;
import java.sql.SQLException;

import org.springframework.context.annotation.AnnotationConfigApplicationContext;

public class SpringMainClass {

	public static void main(String[] args) throws SQLException {
		AnnotationConfigApplicationContext context = new AnnotationConfigApplicationContext();
		context.scan("com.journaldev.spring");
		context.refresh();

		DBConnection dbConnection = context.getBean(DBConnection.class);

		Connection con = dbConnection.getConnection();

		System.out.println(con.getMetaData().getDatabaseProductName());
		System.out.println(con.getMetaData().getDatabaseProductVersion());

		// close the spring context
		context.close();
	}

}
Just run the above class as Java application, it will produce following output.
Getting DBConnection Bean for App: PropertySource Example
Creating DB Connection
Successfully Created DB Connection
MySQL
5.7.18
DBConnection close called
For better readability, I have removed the debug messages produced by spring logging to console.
Matching infrastructure at centron
Node applications need somewhere to run: ccloud³ VMs with full root access from €3.11 per month – or as a managed server if you would rather not run it yourself. Rent a cloud server →
Spring @PropertySource Multiple Files - @PropertySources
There is another way to load multiple property files for a configuration class.
@PropertySources({
@PropertySource("classpath:db.properties"),
@PropertySource("classpath:root.properties")})
public class DBConfiguration {
}
From Java 8 onwards, PropertySource annotation became repeatable. For earlier java versions, @PropertySources was the way to provide multiple property files to the configuration class.
Spring PropertySource Override Values
We can load multiple property files to spring environment. If there are same keys present in multiple files, then the last property file loaded will override the earlier values. So if you are getting unwanted values for your property, check if the same key is present in any other property file and what is the order of loading these property files.
Spring PropertySource External File
Sometimes our configuration files are present on specific location and they are not part of the project classpath. We can configure PropertySource to load property files from file system too.
@PropertySource("file:/Users/pankaj/db.properties")@PropertySource("file:/Users/pankaj/db.properties")@PropertySource("file:/Users/pankaj/db.properties")Spring PropertySource Environment Variable
Notice that the above configuration to read property file from the external location will work for my local system but not for someone else or on the server. We can also read system variables in PropertySource, so below configuration will work for everyone.
@PropertySource("file:${HOME}/db.properties")Spring PropertySource Ignore FileNotFoundException
If the property file is not found, then we will get FileNotFoundException. Sometimes we don’t want to throw exception because our application can work with default values too. We can use PropertySource ignoreResourceNotFound to true to tell Spring framework to don’t throw exception if file is not found.
@PropertySource(value = "classpath:root.properties", ignoreResourceNotFound=true)That’s all for Spring PropertySource Example.
Test your setup on ccloud³
Sign up for ccloud³ and receive €200 starting credit for your project.