Today we will look into One To Many Mapping in Hibernate. We will look into Hibernate One To Many Mapping example using Annotation and XML configuration.
One To Many Mapping in Hibernate
In simple terms, one to many mapping means that one row in a table can be mapped to multiple rows in another table.
For example, think of a Cart system where we have another table for Items. A cart can have multiple items, so here we have one to many mapping.
We will use Cart-Items scenario for our hibernate one to many mapping example.
One To Many Mapping in Hibernate - Database Setup
We can use foreign key constraint for one to many mapping. Below is our database script for Cart and Items table. I am using MySQL database for Hibernate one to many mapping example.
CREATE TABLE `Cart` (
  `cart_id` int(11) unsigned NOT NULL AUTO_INCREMENT,
  `total` decimal(10,0) NOT NULL,
  `name` varchar(10) DEFAULT NULL,
  PRIMARY KEY (`cart_id`)
) ENGINE=InnoDB AUTO_INCREMENT=5 DEFAULT CHARSET=utf8;

CREATE TABLE `Items` (
  `id` int(11) unsigned NOT NULL AUTO_INCREMENT,
  `cart_id` int(11) unsigned NOT NULL,
  `item_id` varchar(10) NOT NULL,
  `item_total` decimal(10,0) NOT NULL,
  `quantity` int(3) NOT NULL,
  PRIMARY KEY (`id`),
  KEY `cart_id` (`cart_id`),
  CONSTRAINT `items_ibfk_1` FOREIGN KEY (`cart_id`) REFERENCES `Cart` (`cart_id`)
) ENGINE=InnoDB AUTO_INCREMENT=7 DEFAULT CHARSET=utf8;
Below is the ER diagram of the Cart and Items table.
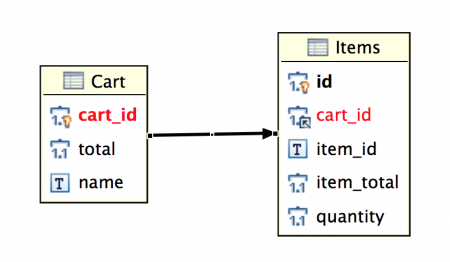
Our database setup is ready, let’s move on to creating hibernate One to Many Mapping example project. First of all, we will use XML based configuration and then we will implement one to many mapping using Hibernate and JPA annotation.
Matching infrastructure at centron
Node applications need somewhere to run: ccloud³ VMs with full root access from €3.11 per month – or as a managed server if you would rather not run it yourself. Rent a cloud server →
Hibernate One To Many Mapping Project Structure
Create a simple Maven project in Eclipse or your favorite IDE. The final project structure will look like below image.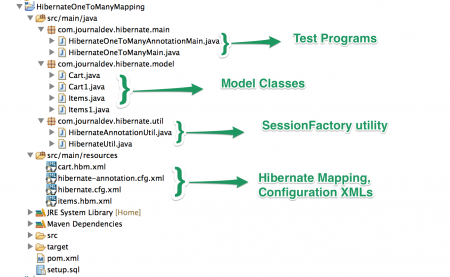
Hibernate Maven Dependencies
Our final pom.xml file contains dependencies for Hibernate and MySQL driver. Hibernate uses JBoss logging and it automatically gets added as transitive dependencies.
<project xmlns="https://maven.apache.org/POM/4.0.0" xmlns:xsi="https://www.w3.org/2001/XMLSchema-instance" xsi:schemaLocation="https://maven.apache.org/POM/4.0.0 https://maven.apache.org/xsd/maven-4.0.0.xsd">
  <modelVersion>4.0.0</modelVersion>
  <groupId>com.journaldev.hibernate</groupId>
  <artifactId>HibernateOneToManyMapping</artifactId>
  <version>0.0.1-SNAPSHOT</version>

  <dependencies>
  	<dependency>
  		<groupId>org.hibernate</groupId>
  		<artifactId>hibernate-core</artifactId>
  		<version>4.3.5.Final</version>
  	</dependency>
  	<dependency>
  		<groupId>mysql</groupId>
  		<artifactId>mysql-connector-java</artifactId>
  		<version>5.0.5</version>
  	</dependency>
  </dependencies>

</project>
Note that I am using latest Hibernate version 4.3.5.Final and MySQL driver version based on my database installation.
Hibernate One To Many Mapping Model Classes
For our tables Cart and Items, we have model classes to reflect them.
Cart.java
package com.journaldev.hibernate.model;

import java.util.Set;

public class Cart {

	private long id;
	private double total;
	private String name;
	private Set items;

	public long getId() {
		return id;
	}
	public void setId(long id) {
		this.id = id;
	}
	public double getTotal() {
		return total;
	}
	public void setTotal(double total) {
		this.total = total;
	}
	public String getName() {
		return name;
	}
	public void setName(String name) {
		this.name = name;
	}
	public Set getItems() {
		return items;
	}
	public void setItems(Set items) {
		this.items = items;
	}

}
I am using Set of Items, so that every record is unique. We can also use List or Array for one to many mapping in Hibernate.
Items.java
package com.journaldev.hibernate.model;

public class Items {

	private long id;
	private String itemId;
	private double itemTotal;
	private int quantity;
	private Cart cart;

	//Hibernate requires no-args constructor
	public Items(){}

	public Items(String itemId, double total, int qty, Cart c){
		this.itemId=itemId;
		this.itemTotal=total;
		this.quantity=qty;
		this.cart=c;
	}
	public String getItemId() {
		return itemId;
	}
	public void setItemId(String itemId) {
		this.itemId = itemId;
	}
	public double getItemTotal() {
		return itemTotal;
	}
	public void setItemTotal(double itemTotal) {
		this.itemTotal = itemTotal;
	}
	public int getQuantity() {
		return quantity;
	}
	public void setQuantity(int quantity) {
		this.quantity = quantity;
	}
	public Cart getCart() {
		return cart;
	}
	public void setCart(Cart cart) {
		this.cart = cart;
	}
	public long getId() {
		return id;
	}
	public void setId(long id) {
		this.id = id;
	}

}
Items have many-to-one relationship to Cart, so we don’t need to have Collection for Cart object.
Hibernate SessionFactory Utility Class
We have a utility class for creating Hibernate SessionFactory.
HibernateUtil.java
package com.journaldev.hibernate.util;

import org.hibernate.SessionFactory;
import org.hibernate.boot.registry.StandardServiceRegistryBuilder;
import org.hibernate.cfg.Configuration;
import org.hibernate.service.ServiceRegistry;

public class HibernateUtil {

	private static SessionFactory sessionFactory;

	private static SessionFactory buildSessionFactory() {
        try {
            // Create the SessionFactory from hibernate.cfg.xml
        	Configuration configuration = new Configuration();
        	configuration.configure("hibernate.cfg.xml");
        	System.out.println("Hibernate Configuration loaded");

        	ServiceRegistry serviceRegistry = new StandardServiceRegistryBuilder().applySettings(configuration.getProperties()).build();
        	System.out.println("Hibernate serviceRegistry created");

        	SessionFactory sessionFactory = configuration.buildSessionFactory(serviceRegistry);

            return sessionFactory;
        }
        catch (Throwable ex) {
            System.err.println("Initial SessionFactory creation failed." + ex);
            ex.printStackTrace();
            throw new ExceptionInInitializerError(ex);
        }
    }

	public static SessionFactory getSessionFactory() {
		if(sessionFactory == null) sessionFactory = buildSessionFactory();
        return sessionFactory;
    }
}
Hibernate Configuration XML File
Our Hibernate configuration XML file contains database information and mapping resource details.
hibernate.cfg.xml
<?xml version="1.0" encoding="UTF-8"?>
<!DOCTYPE hibernate-configuration PUBLIC
		"-//Hibernate/Hibernate Configuration DTD 3.0//EN"
		"https://hibernate.org/dtd/hibernate-configuration-3.0.dtd">
<hibernate-configuration>
    <session-factory>
        <property name="hibernate.connection.driver_class">com.mysql.jdbc.Driver</property>
        <property name="hibernate.connection.password">pankaj123</property>
        <property name="hibernate.connection.url">jdbc:mysql://localhost/TestDB</property>
        <property name="hibernate.connection.username">pankaj</property>
        <property name="hibernate.dialect">org.hibernate.dialect.MySQLDialect</property>

        <property name="hibernate.current_session_context_class">thread</property>
        <property name="hibernate.show_sql">true</property>

        <mapping resource="cart.hbm.xml"/>
        <mapping resource="items.hbm.xml"/>
    </session-factory>
</hibernate-configuration>
Hibernate One To Many Mapping Example - XML Configuration
This is the most important part of the tutorial. Let’s see how we have to map both Cart and Items classes for one to many mapping in Hibernate.
cart.hbm.xml
<?xml version="1.0"?>
<!DOCTYPE hibernate-mapping PUBLIC "-//Hibernate/Hibernate Mapping DTD 3.0//EN"
	"https://hibernate.org/dtd/hibernate-mapping-3.0.dtd">

<hibernate-mapping package="com.journaldev.hibernate.model">
	<class name="Cart" table="CART" >
		<id name="id" type="long">
			<column name="cart_id" />
			<generator />
		</id>
		<property name="total" type="double">
			<column name="total" />
		</property>
		<property name="name" type="string">
			<column name="name" />
		</property>
		<set name="items" table="ITEMS" fetch="select">
			<key>
				<column name="cart_id" not-null="true"></column>
			</key>
			<one-to-many/>
		</set>
	</class>

</hibernate-mapping>
The important part is the set element and one-to-many element inside it. Notice that we are providing a key to be used for one to many mapping i.e., cart_id.
<?xml version="1.0" encoding="UTF-8"?>
<!DOCTYPE hibernate-mapping PUBLIC "-//Hibernate/Hibernate Mapping DTD 3.0//EN"
"https://hibernate.org/dtd/hibernate-mapping-3.0.dtd" >

<hibernate-mapping package="com.journaldev.hibernate.model">

	<class name="Items" table="ITEMS">
		<id name="id" type="long">
			<column name="id" />
			<generator />
		</id>
		<property name="itemId" type="string">
			<column name="item_id"></column>
		</property>
		<property name="itemTotal" type="double">
			<column name="item_total"></column>
		</property>
		<property name="quantity" type="integer">
			<column name="quantity"></column>
		</property>

		<many-to-one name="cart">
			<column name="cart_id" not-null="true"></column>
		</many-to-one>
	</class>

</hibernate-mapping>
Notice that from items to cart, it’s many to one relationship. So we need to use many-to-one element for cart and we are providing column name that will be mapped with the key. So based on the Cart hibernate mapping configuration, it’s key cart_id will be used for mapping. Our project for Hibernate One To Many Mapping Example using XML mapping is ready, let’s write a test program and check if it’s working fine or not.
Hibernate One To Many Mapping Example - Test Program
HibernateOneToManyMain.java
package com.journaldev.hibernate.main;

import java.util.HashSet;
import java.util.Set;

import org.hibernate.Session;
import org.hibernate.SessionFactory;
import org.hibernate.Transaction;

import com.journaldev.hibernate.model.Cart;
import com.journaldev.hibernate.model.Items;
import com.journaldev.hibernate.util.HibernateUtil;

public class HibernateOneToManyMain {

	public static void main(String[] args) {

		Cart cart = new Cart();
		cart.setName("MyCart");

		Items item1 = new Items("I1", 10, 1, cart);
		Items item2 = new Items("I2", 20, 2, cart);
		Set itemsSet = new HashSet();
		itemsSet.add(item1); itemsSet.add(item2);

		cart.setItems(itemsSet);
		cart.setTotal(10*1 + 20*2);

		SessionFactory sessionFactory = null;
		Session session = null;
		Transaction tx = null;
		try{
		//Get Session
		sessionFactory = HibernateUtil.getSessionFactory();
		session = sessionFactory.getCurrentSession();
		System.out.println("Session created");
		//start transaction
		tx = session.beginTransaction();

		//Save the Model objects
		session.save(cart);
		session.save(item1);
		session.save(item2);

		//Commit transaction
		tx.commit();
		System.out.println("Cart ID="+cart.getId());

		}catch(Exception e){
			System.out.println("Exception occured. "+e.getMessage());
			e.printStackTrace();
		}finally{
			if(!sessionFactory.isClosed()){
				System.out.println("Closing SessionFactory");
				sessionFactory.close();
			}
		}
	}

}
Notice that we need to save both Cart and Items objects one by one. Hibernate will take care of updating the foreign keys in Items table. When we execute above program, we get following output.
Hibernate Configuration loaded
Hibernate serviceRegistry created
Session created
Hibernate: insert into CART (total, name) values (?, ?)
Hibernate: insert into ITEMS (item_id, item_total, quantity, cart_id) values (?, ?, ?, ?)
Hibernate: insert into ITEMS (item_id, item_total, quantity, cart_id) values (?, ?, ?, ?)
Hibernate: update ITEMS set cart_id=? where id=?
Hibernate: update ITEMS set cart_id=? where id=?
Cart ID=6
Closing SessionFactory
Notice that Hibernate is using Update query to set the cart_id in ITEMS table.
Hibernate One To Many Mapping Annotation
Now that we have seen how to implement One To Many mapping in Hibernate using XML-based configurations, let’s see how we can do the same thing using JPA annotations.
Hibernate One To Many Mapping Example - Annotation
Hibernate configuration file is almost same, except that mapping element changes because we are using Classes for hibernate one to many mapping using annotation.
hibernate-annotation.cfg.xml
<!--?xml version="1.0" encoding="UTF-8"?-->


        com.mysql.jdbc.Driver
        pankaj123
        jdbc:mysql://localhost/TestDB
        pankaj
        org.hibernate.dialect.MySQLDialect

        thread
        true
Hibernate SessionFactory Utility Class
SessionFactory utility class is almost same, we just need to use the new hibernate configuration file. HibernateAnnotationUtil.java
package com.journaldev.hibernate.util;

import org.hibernate.SessionFactory;
import org.hibernate.boot.registry.StandardServiceRegistryBuilder;
import org.hibernate.cfg.Configuration;
import org.hibernate.service.ServiceRegistry;

public class HibernateAnnotationUtil {

	private static SessionFactory sessionFactory;

	private static SessionFactory buildSessionFactory() {
        try {
            // Create the SessionFactory from hibernate-annotation.cfg.xml
        	Configuration configuration = new Configuration();
        	configuration.configure("hibernate-annotation.cfg.xml");
        	System.out.println("Hibernate Annotation Configuration loaded");

        	ServiceRegistry serviceRegistry = new StandardServiceRegistryBuilder().applySettings(configuration.getProperties()).build();
        	System.out.println("Hibernate Annotation serviceRegistry created");

        	SessionFactory sessionFactory = configuration.buildSessionFactory(serviceRegistry);

            return sessionFactory;
        }
        catch (Throwable ex) {
            System.err.println("Initial SessionFactory creation failed." + ex);
            ex.printStackTrace();
            throw new ExceptionInInitializerError(ex);
        }
    }

	public static SessionFactory getSessionFactory() {
		if(sessionFactory == null) sessionFactory = buildSessionFactory();
        return sessionFactory;
    }
}
Hibernate One To Many Mapping Annotation Model Classes
Since we don’t have xml based mapping files, all the mapping related configurations will be done using JPA annotations in the model classes. If you understand the xml based mapping, it’s very simple and similar.
Cart1.java
package com.journaldev.hibernate.model;

import java.util.Set;

import javax.persistence.Column;
import javax.persistence.Entity;
import javax.persistence.GeneratedValue;
import javax.persistence.GenerationType;
import javax.persistence.Id;
import javax.persistence.OneToMany;
import javax.persistence.Table;

@Entity
@Table(name="CART")
public class Cart1 {

	@Id
	@GeneratedValue(strategy=GenerationType.IDENTITY)
	@Column(name="cart_id")
	private long id;

	@Column(name="total")
	private double total;

	@Column(name="name")
	private String name;

	@OneToMany(mappedBy="cart1")
	private Set items1;

// Getter Setter methods for properties
}
Important point to note is the OneToMany annotation where mappedByvariable is used to define the property in Items1 class that will be used for the mapping purpose. So we should have a property named “cart1” in Items1 class. Don’t forget to include all the getter-setter methods. Items1.java
package com.journaldev.hibernate.model;

import javax.persistence.Column;
import javax.persistence.Entity;
import javax.persistence.GeneratedValue;
import javax.persistence.GenerationType;
import javax.persistence.Id;
import javax.persistence.JoinColumn;
import javax.persistence.ManyToOne;
import javax.persistence.Table;

@Entity
@Table(name="ITEMS")
public class Items1 {

	@Id
	@GeneratedValue(strategy=GenerationType.IDENTITY)
	@Column(name="id")
	private long id;

	@Column(name="item_id")
	private String itemId;

	@Column(name="item_total")
	private double itemTotal;

	@Column(name="quantity")
	private int quantity;

	@ManyToOne
	@JoinColumn(name="cart_id", nullable=false)
	private Cart1 cart1;

	//Hibernate requires no-args constructor
	public Items1(){}

	public Items1(String itemId, double total, int qty, Cart1 c){
		this.itemId=itemId;
		this.itemTotal=total;
		this.quantity=qty;
		this.cart1=c;
	}
//Getter Setter methods
}
Most important point in above class is the ManyToOne annotation on Cart1 class variable and JoinColumn annotation to provide the column name for mapping. That’s it for one to many mapping in hibernate using annotation in model classes. Compare it with XML based configurations, you will find them very similar. Let’s write a test program and execute it.
Hibernate One To Many Mapping Annotation Example - Test Program
Our test program is just like xml based configuration, we are just using the new classes for getting Hibernate Session and saving the model objects into database.
HibernateOneToManyAnnotationMain.java
package com.journaldev.hibernate.main;

import java.util.HashSet;
import java.util.Set;

import org.hibernate.Session;
import org.hibernate.SessionFactory;
import org.hibernate.Transaction;

import com.journaldev.hibernate.model.Cart1;
import com.journaldev.hibernate.model.Items1;
import com.journaldev.hibernate.util.HibernateAnnotationUtil;

public class HibernateOneToManyAnnotationMain {

	public static void main(String[] args) {

		Cart1 cart = new Cart1();
		cart.setName("MyCart1");

		Items1 item1 = new Items1("I10", 10, 1, cart);
		Items1 item2 = new Items1("I20", 20, 2, cart);
		Set itemsSet = new HashSet();
		itemsSet.add(item1); itemsSet.add(item2);

		cart.setItems1(itemsSet);
		cart.setTotal(10*1 + 20*2);

		SessionFactory sessionFactory = null;
		Session session = null;
		Transaction tx = null;
		try{
		//Get Session
		sessionFactory = HibernateAnnotationUtil.getSessionFactory();
		session = sessionFactory.getCurrentSession();
		System.out.println("Session created");
		//start transaction
		tx = session.beginTransaction();
		//Save the Model object
		session.save(cart);
		session.save(item1);
		session.save(item2);
		//Commit transaction
		tx.commit();
		System.out.println("Cart1 ID="+cart.getId());
		System.out.println("item1 ID="+item1.getId()+", Foreign Key Cart ID="+item1.getCart1().getId());
		System.out.println("item2 ID="+item2.getId()+", Foreign Key Cart ID="+item1.getCart1().getId());

		}catch(Exception e){
			System.out.println("Exception occured. "+e.getMessage());
			e.printStackTrace();
		}finally{
			if(!sessionFactory.isClosed()){
				System.out.println("Closing SessionFactory");
				sessionFactory.close();
			}
		}
	}

}
When we execute above hibernate one to many mapping annotation example test program, we get following output.
Hibernate Annotation Configuration loaded
Hibernate Annotation serviceRegistry created
Session created
Hibernate: insert into CART (name, total) values (?, ?)
Hibernate: insert into ITEMS (cart_id, item_id, item_total, quantity) values (?, ?, ?, ?)
Hibernate: insert into ITEMS (cart_id, item_id, item_total, quantity) values (?, ?, ?, ?)
Cart1 ID=7
item1 ID=9, Foreign Key Cart ID=7
item2 ID=10, Foreign Key Cart ID=7
Closing SessionFactory
Conclusion
In this tutorial, we explored Hibernate's One To Many Mapping using both XML and annotation-based configurations.
We demonstrated how to create database tables, map them to Java classes, and implement test programs to verify the mappings.
Hibernate makes it easy to handle relationships between database tables, and understanding these mappings is crucial for building robust and efficient data access layers.
Both approaches have their advantages, and the choice largely depends on the project context. Using JPA annotations is more common in modern applications due to its simplicity and integration with Java classes.
Test your setup on ccloud³
Sign up for ccloud³ and receive €200 starting credit for your project.