Overview
If you work on web services, you must have been using XSD. To test the web service, you need to generate XML from XSD file.
Matching infrastructure at centron
Node applications need somewhere to run: ccloud³ VMs with full root access from €3.11 per month – or as a managed server if you would rather not run it yourself. Rent a cloud server →
Steps to Generate XML from XSD
We can use Eclipse IDE to easily generate XML from the XSD file. Just follow the below steps to get XML from XSD.
- Select XSD File in project, right click for Menu and select Generate > XML File…
- Provide the XML file Name and XML File location in the popup window. Click on next button.
- Select the root element for which you want to generate the sample XML file, make sure to select checkboxes for “Create optional attributes” and “Create optional elements”. Below image shows how the window will look.
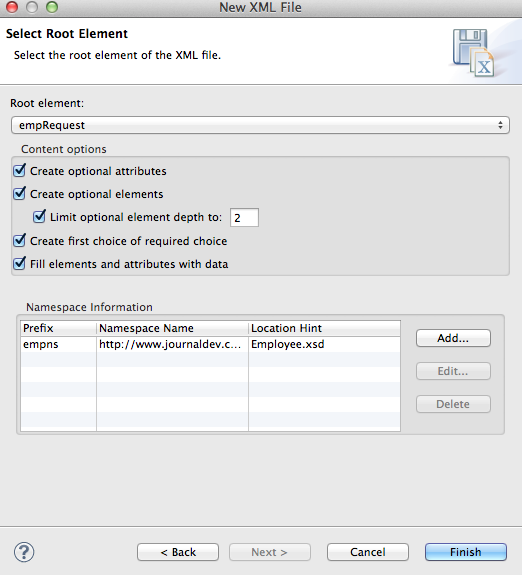
- Click on Finish button and it will generate the XML File for you with the default values. Now you can change the values according to your requirement.
XSD to XML Example
Here is the XSD for which I will be generating XML files. Employee.xsd
Employee.xsd
<?xml version="1.0" encoding="UTF-8"?>
<schema xmlns="https://www.w3.org/2001/XMLSchema"
targetNamespace="https://www.journaldev.com/Employee"
xmlns:empns="https://www.journaldev.com/Employee" elementFormDefault="qualified">

	<element name="empRequest" type="empns:empRequest"></element>

	<element name="empResponse" type="empns:empResponse"></element>

	<complexType name="empRequest">
		<sequence>
			<element name="id" type="int"></element>
		</sequence>
	</complexType>

	<complexType name="empResponse">
		<sequence>
			<element name="id" type="int"></element>
			<element name="role" type="string"></element>
			<element name="fullName" type="string"></element>
		</sequence>
	</complexType>
</schema>
Since Employee.xsd has two root elements; empRequest and empResponse; I can generate two XML files. Here are the XML files generated by Eclipse, the values are changed by me. EmployeeRequest.xml
EmployeeRequest.xml
<?xml version="1.0" encoding="UTF-8"?>
<empns:empRequest xmlns:empns="https://www.journaldev.com/Employee" xmlns:xsi="https://www.w3.org/2001/XMLSchema-instance" xsi:schemaLocation="https://www.journaldev.com/Employee Employee.xsd ">
  <empns:id>5</empns:id>
</empns:empRequest>
EmployeeResponse.xml
<?xml version="1.0" encoding="UTF-8"?>
<empns:empResponse xmlns:empns="https://www.journaldev.com/Employee" xmlns:xsi="https://www.w3.org/2001/XMLSchema-instance" xsi:schemaLocation="https://www.journaldev.com/Employee Employee.xsd ">
  <empns:id>1</empns:id>
  <empns:role>Developer</empns:role>
  <empns:fullName>Pankaj Kumar</empns:fullName>
</empns:empResponse>
Conclusion of Generating XML From XSD
I hope this quick tip will help you in generating XML from XSD easily. Generating XML from XSD in Eclipse is a straightforward process that simplifies working with web services and XML schema validation. By following the outlined steps, you can quickly create sample XML files tailored to your needs. This method not only saves time but also ensures consistency and accuracy in testing and development. Whether you're a beginner or an experienced developer, mastering this process will enhance your workflow and make XML management more efficient.
Test your setup on ccloud³
Sign up for ccloud³ and receive €200 starting credit for your project.