Sometime back in Spring MVC Tutorial, I explained how to create Spring MVC application using Spring Tool Suite. But today, I will be creating a basic hello world spring MVC application using maven and Eclipse.
Spring MVC Example
Spring MVC is based on Model-View-Controller architecture.
DispatcherServlet is the front controller class to take all requests and start processing them. We have to configure it in web.xml file. Its job is to pass request to appropriate controller class and send the response back when view pages have rendered the response page. HomeController.java will be the single controller class in our spring mvc example application. home.jsp, user.jsp are the view pages in our spring mvc hello world example application. User.java will be the only model class we will have in our spring mvc example web application.
Matching infrastructure at centron
Node applications need somewhere to run: ccloud³ VMs with full root access from €3.11 per month – or as a managed server if you would rather not run it yourself. Rent a cloud server →
Spring MVC Example Hello World Eclipse Project
Below image shows our Spring MVC example project in Eclipse.
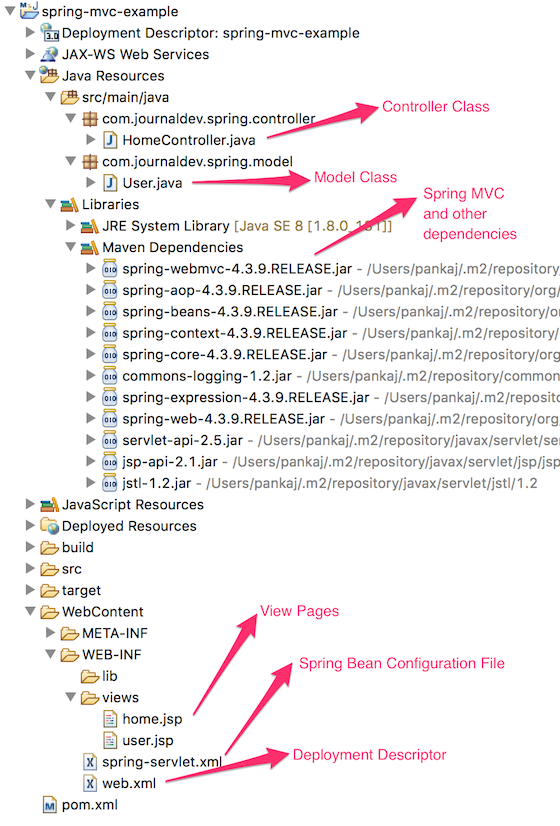
Let’s Get Started and Create Our Project Right from the Scratch
Spring MVC Example Eclipse Project Setup
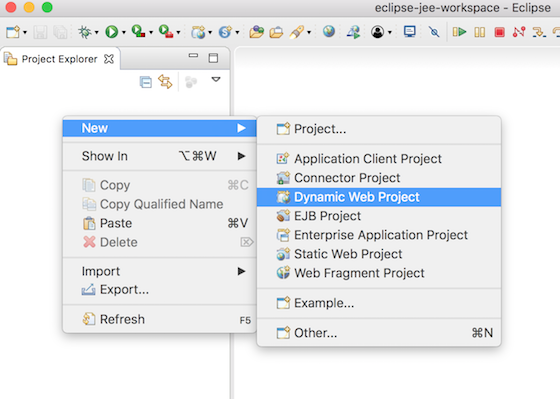
Since it’s a web application and we want to use maven for dependencies management, first of all we have to create a dynamic web application and then convert it to a maven project. Below images show how to do this and get our project skeleton structure ready. Right click on the project explorer window and click on “New -> Dynamic Web Project” as shown in below image.
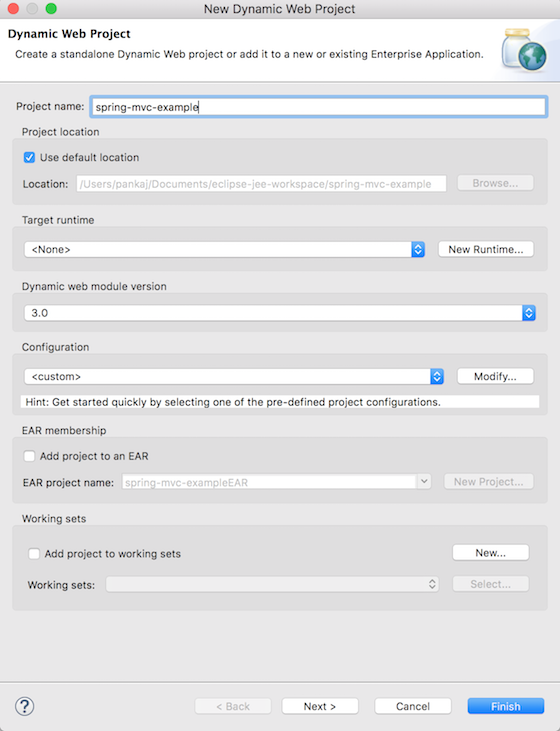
Provide name as “spring-mvc-example” in the next popup page, rest of the things should not required to be changed.
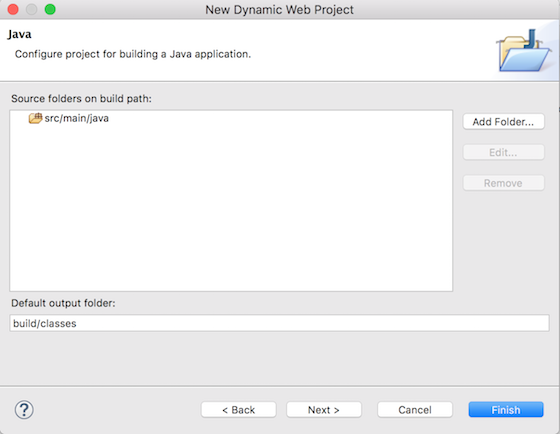
On next page, provide the source folder as “src/main/java”. You might have to remove “src” folder from the list before adding this.
Next is the web module page, provide the context root of application as “spring-mvc-example” and make sure to check “Generate web.xml deployment descriptor” option.
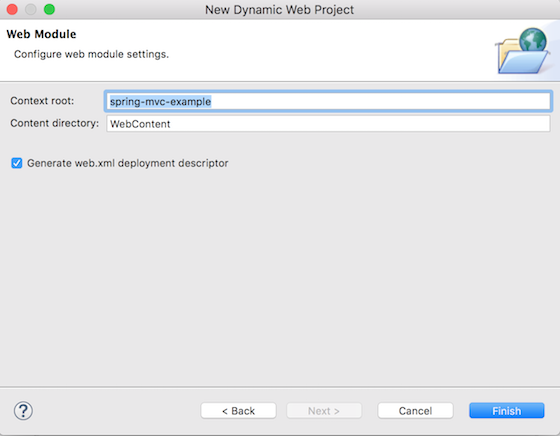
Click on Finish and you will have a new Dynamic Web Project in your Eclipse project explorer.
Converting Dynamic Web Project to Maven Project
We want to use Maven to easily manage our Spring MVC dependencies. So let’s convert our web project to Maven. Right click on the project and select “Configure -> Convert to Maven Project”.
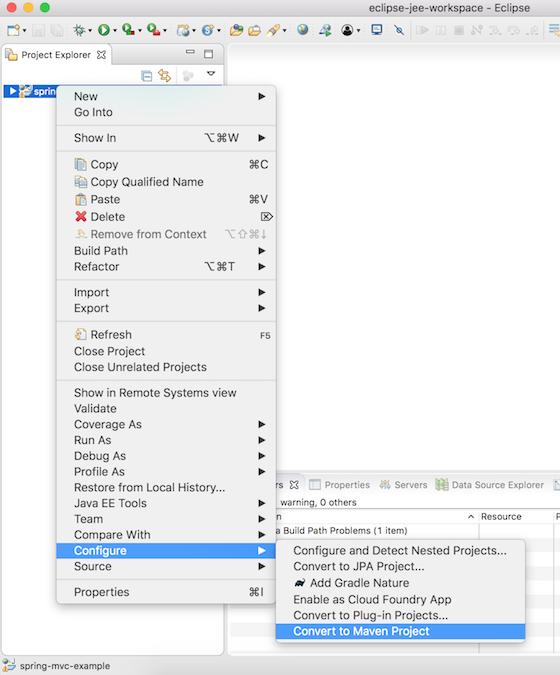
Next provide the pom.xml configurations as shown below.
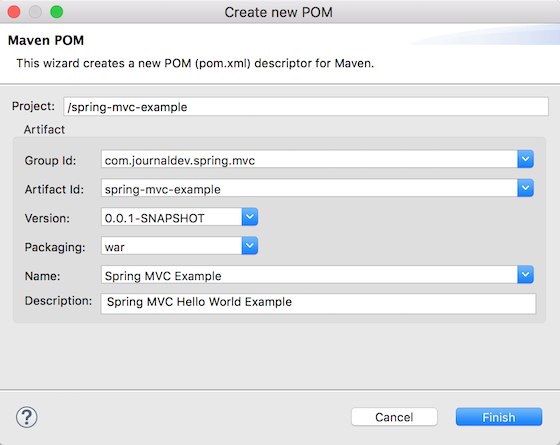
Our maven web application project skeleton code is ready. Now we can start making changes to it and create our Spring MVC hello world example application.
Spring MVC Dependencies to pom.xml
We need to add spring-web and spring-webmvc dependencies in pom.xml, also add servlet-api, jsp-api and jstl dependencies. Our final pom.xml file will be like below.
<project xmlns="https://maven.apache.org/POM/4.0.0" xmlns:xsi="https://www.w3.org/2001/XMLSchema-instance"
    xsi:schemaLocation="https://maven.apache.org/POM/4.0.0 https://maven.apache.org/xsd/maven-4.0.0.xsd">
    <modelVersion>4.0.0</modelVersion>
    <groupId>com.journaldev.spring.mvc</groupId>
    <artifactId>spring-mvc-example</artifactId>
    <version>0.0.1-SNAPSHOT</version>
    <packaging>war</packaging>
    <name>Spring MVC Example</name>
    <description>Spring MVC Hello World Example</description>

    <!-- Add Spring Web and MVC dependencies -->
    <dependencies>
        <dependency>
            <groupId>org.springframework</groupId>
            <artifactId>spring-webmvc</artifactId>
            <version>4.3.9.RELEASE</version>
        </dependency>
        <dependency>
            <groupId>org.springframework</groupId>
            <artifactId>spring-web</artifactId>
            <version>4.3.9.RELEASE</version>
        </dependency>
        <!-- Servlet -->
        <dependency>
            <groupId>javax.servlet</groupId>
            <artifactId>servlet-api</artifactId>
            <version>2.5</version>
            <scope>provided</scope>
        </dependency>
        <dependency>
            <groupId>javax.servlet.jsp</groupId>
            <artifactId>jsp-api</artifactId>
            <version>2.1</version>
            <scope>provided</scope>
        </dependency>
        <dependency>
            <groupId>javax.servlet</groupId>
            <artifactId>jstl</artifactId>
            <version>1.2</version>
        </dependency>
    </dependencies>

    <build>
        <plugins>
            <plugin>
                <artifactId>maven-compiler-plugin</artifactId>
                <version>3.6.1</version>
                <configuration>
                    <source>1.8</source>
                    <target>1.8</target>
                </configuration>
            </plugin>
            <plugin>
                <artifactId>maven-war-plugin</artifactId>
                <version>3.0.0</version>
                <configuration>
                    <warSourceDirectory>WebContent</warSourceDirectory>
                </configuration>
            </plugin>
        </plugins>
        <finalName>${project.artifactId}</finalName> <!-- added to remove Version from WAR file -->
    </build>
</project>
Notice the finalName configuration in build, so that our WAR file name doesn’t have version details. When the project is built by Eclipse, you will notice all the jars showing up in maven dependencies section.
Spring MVC DispatcherServlet as Front Controller
We have to add Spring MVC framework to our web application, for that we need to configure DispatcherServlet in web.xml as shown below.
<?xml version="1.0" encoding="UTF-8"?>
<web-app xmlns:xsi="https://www.w3.org/2001/XMLSchema-instance" xmlns="https://java.sun.com/xml/ns/javaee" xsi:schemaLocation="https://java.sun.com/xml/ns/javaee https://java.sun.com/xml/ns/javaee/web-app_3_0.xsd" version="3.0">
  <display-name>spring-mvc-example</display-name>

  <!-- Add Spring MVC DispatcherServlet as front controller -->
  <servlet>
    <servlet-name>spring</servlet-name>
    <servlet-class>
      org.springframework.web.servlet.DispatcherServlet
    </servlet-class>
    <init-param>
      <param-name>contextConfigLocation</param-name>
      <param-value>/WEB-INF/spring-servlet.xml</param-value>
    </init-param>
    <load-on-startup>1</load-on-startup>
  </servlet>
  <servlet-mapping>
    <servlet-name>spring</servlet-name>
    <url-pattern>/</url-pattern>
  </servlet-mapping>
</web-app>
contextConfigLocation init-param is used to provide the location of spring bean configuration file.
Spring MVC Example Bean Configuration File
Next step is to create spring bean configuration file spring-servlet.xml as shown below.
<?xml version="1.0" encoding="UTF-8"?>
<beans:beans xmlns="https://www.springframework.org/schema/mvc"
  xmlns:xsi="https://www.w3.org/2001/XMLSchema-instance" xmlns:beans="https://www.springframework.org/schema/beans"
  xmlns:context="https://www.springframework.org/schema/context"
  xsi:schemaLocation="https://www.springframework.org/schema/mvc https://www.springframework.org/schema/mvc/spring-mvc.xsd
    https://www.springframework.org/schema/beans https://www.springframework.org/schema/beans/spring-beans.xsd
    https://www.springframework.org/schema/context https://www.springframework.org/schema/context/spring-context.xsd">

  <!-- DispatcherServlet Context: defines this servlet's request-processing infrastructure -->

  <!-- Enables the Spring MVC @Controller programming model -->
  <annotation-driven />
  <context:component-scan base-package="com.journaldev.spring" />

  <!-- Resolves views selected for rendering by @Controllers to .jsp resources in the /WEB-INF/views directory -->
  <beans:bean>
    <beans:property name="prefix" value="/WEB-INF/views/" />
    <beans:property name="suffix" value=".jsp" />
  </beans:bean>

</beans:beans>
There are three important configurations.
- annotation-driven tells DispatcherServlet to look for Controller classes using @Controller annotation.
- context:component-scan tells DispatcherServlet where to look for controller classes.
- InternalResourceViewResolver bean configuration to specify location of view pages and suffix used. Controller class methods return name of the view page and then suffix is added to figure out the view page to use for rendering the response.
Spring MVC Controller Class
We have a single controller class to respond for two URIs - “/” for home page and “/user” for user page.
package com.journaldev.spring.controller;

import java.text.DateFormat;
import java.util.Date;
import java.util.Locale;

import org.springframework.stereotype.Controller;
import org.springframework.ui.Model;
import org.springframework.validation.annotation.Validated;
import org.springframework.web.bind.annotation.RequestMapping;
import org.springframework.web.bind.annotation.RequestMethod;

import com.journaldev.spring.model.User;

@Controller
public class HomeController {

    /**
     * Simply selects the home view to render by returning its name.
     */
    @RequestMapping(value = "/", method = RequestMethod.GET)
    public String home(Locale locale, Model model) {
        System.out.println("Home Page Requested, locale = " + locale);
        Date date = new Date();
        DateFormat dateFormat = DateFormat.getDateTimeInstance(DateFormat.LONG, DateFormat.LONG, locale);

        String formattedDate = dateFormat.format(date);

        model.addAttribute("serverTime", formattedDate);

        return "home";
    }

    @RequestMapping(value = "/user", method = RequestMethod.POST)
    public String user(@Validated User user, Model model) {
        System.out.println("User Page Requested");
        model.addAttribute("userName", user.getUserName());
        return "user";
    }
}
Note that for simplicity, I have not used any logging framework such as log4j.
Spring MVC Model Class
We have a simple model class with a single variable and its getter-setter methods. It’s a simple POJO class.
package com.journaldev.spring.model;

public class User {
    private String userName;

    public String getUserName() {
        return userName;
    }

    public void setUserName(String userName) {
        this.userName = userName;
    }
}
Spring MVC View Pages
We have two view pages as defined below. home.jsp
<%@ page language="java" contentType="text/html; charset=UTF-8"
    pageEncoding="UTF-8"%>
<%@ taglib uri="https://java.sun.com/jsp/jstl/core" prefix="c"%>
<%@ page session="false"%>
<html>
<head>
<title>Home</title>
</head>
<body>
    <h1>Hello world!</h1>

    <P>The time on the server is ${serverTime}.</p>

    <form action="user" method="post">
        <input type="text" name="userName"><br> <input
            type="submit" value="Login">
    </form>
</body>
</html>
user.jsp
<%@ page language="java" contentType="text/html; charset=UTF-8"
    pageEncoding="UTF-8"%>
<!DOCTYPE html PUBLIC "-//W3C//DTD HTML 4.01 Transitional//EN" "https://www.w3.org/TR/html4/loose.dtd">
<html>
<head>
<meta http-equiv="Content-Type" content="text/html; charset=UTF-8">
<title>User Home Page</title>
</head>
<body>
<h3>Hi ${userName}</h3>
</body>
</html>
Notice that Spring MVC takes care of mapping form variables to model class variables, that’s why we have the same variable name in both places. That’s it, our Spring MVC example project is ready to be deployed and tested.
Spring MVC Eclipse Project Deployment
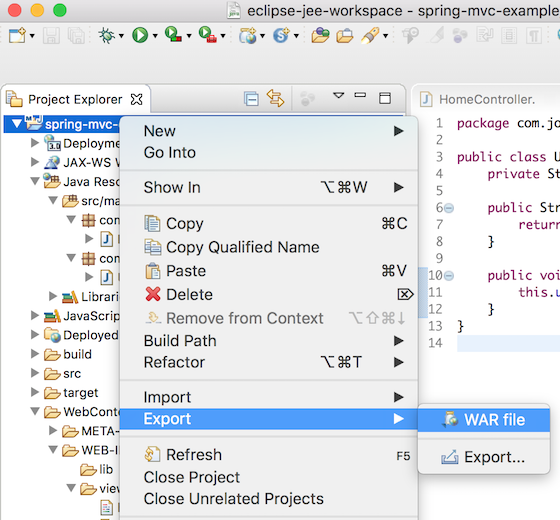
We can use Eclipse export as WAR file option to deploy it directly to any running Tomcat server webapps directory. However, you can also use the command line to build the project and then copy it into your favorite servlet container deployment directory.
Spring MVC Example Test
Once the spring mvc project is deployed, we can access the home page at https://localhost:8080/spring-mvc-example/. Change the Tomcat port and context-root accordingly.
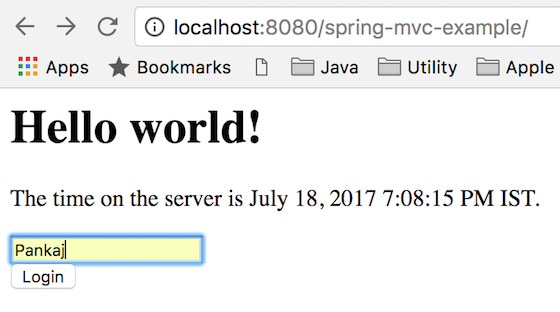
That’s all for Spring MVC example, I have tried to keep it as simple as possible.
Test your setup on ccloud³
Sign up for ccloud³ and receive €200 starting credit for your project.