Spring RestTemplate provides a convenient way to test RESTful web services.
Introduction to Spring RestTemplate
- Spring RestTemplate class is part of spring-web, introduced in Spring 3.
- We can use RestTemplate to test HTTP based restful web services, it doesn’t support HTTPS protocol.
- RestTemplate class provides overloaded methods for different HTTP methods, such as GET, POST, PUT, DELETE etc.
Matching infrastructure at centron
Hardening does not stop at the server: cloud firewalls filter traffic before it reaches the VM – centrally managed, no per-rule surcharge. Explore cloud firewalls →
Spring RestTemplate Example
Below table illustrates the URIs supported by this rest web service.
| URI | HTTP Method | Description |
|---|---|---|
| /springData/person | GET | Get all persons from database |
| /springData/person/{id} | GET | Get person by id |
| /springData/person | POST | Add person to database |
| /springData/person | PUT | Update person |
| /springData/person/{id} | DELETE | Delete person by id |
Let’s start creating our Rest client project to test these web services. Below image shows our final Spring RestTemplate example project.
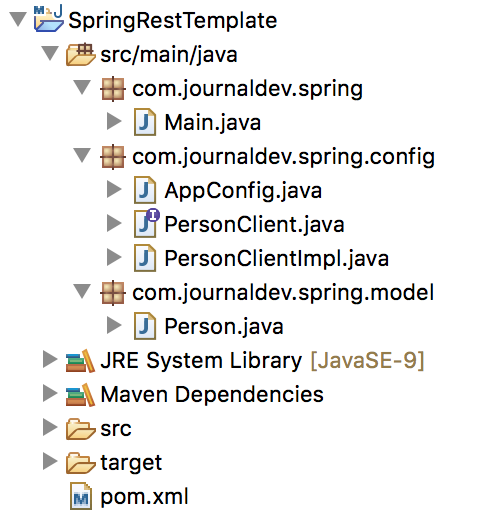
Spring RestTemplate Maven Dependencies
We need spring-core, spring-context dependencies for spring framework. Then we need spring-web artefact that contains RestTemplate class. We also need jackson-mapper-asl for Spring JSON support through Jackson API.
<?xml version="1.0" encoding="UTF-8"?>
<project xmlns="https://maven.apache.org/POM/4.0.0" xmlns:xsi="https://www.w3.org/2001/XMLSchema-instance"
    xsi:schemaLocation="https://maven.apache.org/POM/4.0.0 https://maven.apache.org/xsd/maven-4.0.0.xsd">
    <modelVersion>4.0.0</modelVersion>

    <groupId>com.journaldev.spring</groupId>
    <artifactId>SpringRestTemplate</artifactId>
    <version>1.0-SNAPSHOT</version>
    <properties>
        <spring.framework>4.3.0.RELEASE</spring.framework>
        <spring.web>3.0.2.RELEASE</spring.web>
        <serializer.version>2.8.1</serializer.version>
    </properties>
    <dependencies>
        <dependency>
            <groupId>org.springframework</groupId>
            <artifactId>spring-core</artifactId>
            <version>${spring.framework}</version>
        </dependency>
        <dependency>
            <groupId>org.springframework</groupId>
            <artifactId>spring-context</artifactId>
            <version>${spring.framework}</version>
        </dependency>
        <dependency>
            <groupId>org.codehaus.jackson</groupId>
            <artifactId>jackson-mapper-asl</artifactId>
            <version>1.9.4</version>
        </dependency>
        <dependency>
            <groupId>org.springframework</groupId>
            <artifactId>spring-web</artifactId>
            <version>${spring.web}</version>
        </dependency>
    </dependencies>
</project>
Spring Configuration Class
We have to define a spring bean for RestTemplate class, that’s done in AppConfig class.
package com.journaldev.spring.config;

        import org.codehaus.jackson.map.ObjectMapper;
        import org.springframework.context.annotation.Bean;
        import org.springframework.context.annotation.ComponentScan;
        import org.springframework.context.annotation.Configuration;
        import org.springframework.http.converter.json.MappingJacksonHttpMessageConverter;
        import org.springframework.web.client.RestTemplate;

        @Configuration
        @ComponentScan("com.journaldev.spring")
        public class AppConfig {

            @Bean
            RestTemplate restTemplate() {
                RestTemplate restTemplate = new RestTemplate();
                MappingJacksonHttpMessageConverter converter = new MappingJacksonHttpMessageConverter();
                converter.setObjectMapper(new ObjectMapper());
                restTemplate.getMessageConverters().add(converter);
                return restTemplate;
            }
        }
Note that RestTemplate uses MessageConverter and we need to set this property in the RestTemplate bean. In our example, we are using MappingJacksonHttpMessageConverter for fetching data from JSON format.
Model Class
Since we are trying to convert JSON returned by our web service to a Java object using Jackson mapper, we have to create the model class for this. Note that this model class will be very similar to the model class used in the web service, except that here we don’t need JPA annotations.
package com.journaldev.spring.model;

public class Person {

    private Long id;
    private Integer age;
    private String firstName;
    private String lastName;

    public Person() {
    }

    public Long getId() {
        return id;
    }

    public void setId(Long id) {
        this.id = id;
    }

    public Integer getAge() {
        return age;
    }

    public void setAge(Integer age) {
        this.age = age;
    }

    public String getFirstName() {
        return firstName;
    }

    public void setFirstName(String firstName) {
        this.firstName = firstName;
    }

    public String getLastName() {
        return lastName;
    }

    public void setLastName(String lastName) {
        this.lastName = lastName;
    }

    @Override
    public String toString() {
        return "Person{" + "id=" + id + ", age=" + age + ", firstName='" + firstName + '\'' + ", lastName='" + lastName + '\'' + '}';
    }
}
Spring RestTemplate Client Class
Final step is to create the client classes that will use RestTemplate bean defined above.
package com.journaldev.spring.config;

import java.util.List;
import org.springframework.http.HttpStatus;
import com.journaldev.spring.model.Person;

public interface PersonClient {
    List<Person> getAllPerson();
    Person getById(Long id);
    HttpStatus addPerson(Person person);
    void updatePerson(Person person);
    void deletePerson(Long id);
}package com.journaldev.spring.config;
import java.util.Arrays;
import java.util.List;
import org.springframework.beans.factory.annotation.Autowired;
import org.springframework.http.HttpStatus;
import org.springframework.http.ResponseEntity;
import org.springframework.stereotype.Service;
import org.springframework.web.client.RestTemplate;
import com.journaldev.spring.model.Person;
@Service
public class PersonClientImpl implements PersonClient {
@Autowired
RestTemplate restTemplate;
final String ROOT_URI = "https://localhost:8080/springData/person";
public List<Person> getAllPerson() {
ResponseEntity<Person[]> response = restTemplate.getForEntity(ROOT_URI, Person[].class);
return Arrays.asList(response.getBody());
}
public Person getById(Long id) {
ResponseEntity<Person> response = restTemplate.getForEntity(ROOT_URI + "/"+id, Person.class);
return response.getBody();
}
public HttpStatus addPerson(Person person) {
ResponseEntity<HttpStatus> response = restTemplate.postForEntity(ROOT_URI, person, HttpStatus.class);
return response.getBody();
}
public void updatePerson(Person person) {
restTemplate.put(ROOT_URI, person);
}
public void deletePerson(Long id) {
restTemplate.delete(ROOT_URI + id);
}
}The code is self-explanatory, we are calling RestTemplate methods based on the URI and the HTTP method and by passing appropriate request object if needed.
Spring RestTemplate Test Class
It’s time to test our Spring RestTemplate example project, below class shows how to use RestTemplate methods in Spring way.
package com.journaldev.spring;

import org.springframework.context.annotation.AnnotationConfigApplicationContext;
import org.springframework.http.HttpStatus;
import com.journaldev.spring.config.AppConfig;
import com.journaldev.spring.config.PersonClient;
import com.journaldev.spring.model.Person;

public class Main {

    public static void main(String[] args) {
        AnnotationConfigApplicationContext applicationContext = new AnnotationConfigApplicationContext(AppConfig.class);
        PersonClient client = applicationContext.getBean(PersonClient.class);

        System.out.println("Getting list of all people:");
        for (Person p : client.getAllPerson()) {
            System.out.println(p);
        }

        System.out.println("\nGetting person with ID 2");
        Person personById = client.getById(2L);
        System.out.println(personById);

        System.out.println("Adding a Person");
        Person p = new Person();
        p.setAge(50);
        p.setFirstName("David");
        p.setLastName("Blain");
        HttpStatus status = client.addPerson(p);
        System.out.println("Add Person Response = " + status);

        applicationContext.close();
    }
}
When I run the above program against my local setup, I get the following output:
Getting list of all people:
Person{id=2, age=30, firstName='Oksi', lastName=' Bahatskaya'}
Person{id=1, age=30, firstName='Vlad', lastName='Mateo'}

Getting person with ID 2
Person{id=2, age=30, firstName='Oksi', lastName=' Bahatskaya'}
Adding a Person
Add Person Response = 201
Below image shows the web service database table data before and after executing the above program.
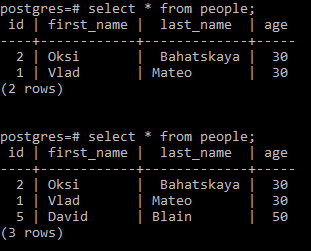
As you can see, the program output matches with the sample table data. That’s all for the Spring RestTemplate example.
%5Btags%5D
/tutorials/what-is-java-string-pool
/tutorials/using-the-puts-function-in-c-c
Test your setup on ccloud³
Sign up for ccloud³ and receive €200 starting credit for your project.