In this tutorial, we will learn about the sigmoid activation function. The sigmoid function always returns an output between 0 and 1.
Need more GPU power for this project?
Dedicated NVIDIA GPUs (RTX A4000 to A100) from German data centers – from €92.59/month, billed by the hour, ready in minutes. Rent a GPU server →
After this tutorial you will know:
- What is an activation function?
- How to implement the sigmoid function in python?
- How to plot the sigmoid function in python?
- Where do we use the sigmoid function?
- What are the problems caused by the sigmoid activation function?
- Better alternatives to the sigmoid activation.
What is an Activation Function?
An activation function is a mathematical function that controls the output of a neural network. Activation functions help in determining whether a neuron is to be fired or not.
Popular Activation Functions
- Binary Step
- Linear
- Sigmoid
- Tanh
- ReLU
- Leaky ReLU
- Softmax
Activation is responsible for adding non-linearity to the output of a neural network model. Without an activation function, a neural network is simply a linear regression.
Sigmoid Activation Function Formula
The mathematical equation for calculating the output of a neural network is:

Activation Function
In this tutorial, we will focus on the sigmoid activation function. This function comes from the sigmoid function in maths.
The Formula for the Sigmoid Activation Function
Mathematically you can represent the sigmoid activation function as:
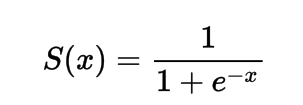 Formula
You can see that the denominator will always be greater than 1, therefore the output will always be between 0 and 1.
Implementing the Sigmoid Activation Function in Python
In this section, we will learn how to implement the sigmoid activation function in Python.
import numpy as np
def sig(x):
 return 1/(1 + np.exp(-x))
Let’s try running the function on some inputs.
import numpy as np
def sig(x):
 return 1/(1 + np.exp(-x))

x = 1.0
print('Applying Sigmoid Activation on (%.1f) gives %.1f' % (x, sig(x)))

x = -10.0
print('Applying Sigmoid Activation on (%.1f) gives %.1f' % (x, sig(x)))

x = 0.0
print('Applying Sigmoid Activation on (%.1f) gives %.1f' % (x, sig(x)))

x = 15.0
print('Applying Sigmoid Activation on (%.1f) gives %.1f' % (x, sig(x)))

x = -2.0
print('Applying Sigmoid Activation on (%.1f) gives %.1f' % (x, sig(x)))
Output:
- Applying Sigmoid Activation on (1.0) gives 0.7
- Applying Sigmoid Activation on (-10.0) gives 0.0
- Applying Sigmoid Activation on (0.0) gives 0.5
- Applying Sigmoid Activation on (15.0) gives 1.0
- Applying Sigmoid Activation on (-2.0) gives 0.1
Plotting Sigmoid Activation using Python
To plot sigmoid activation we’ll use the Numpy library:
import numpy as np
import matplotlib.pyplot as plt
x = np.linspace(-10, 10, 50)
p = sig(x)
plt.xlabel("x")
plt.ylabel("Sigmoid(x)")
plt.plot(x, p)
plt.show()
Output:
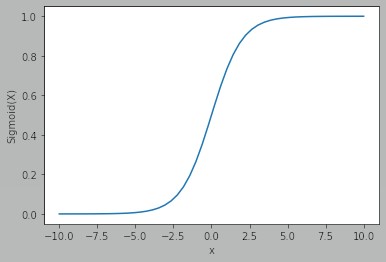 Sigmoid
We can see that the output is between 0 and 1.
The sigmoid function is commonly used for predicting probabilities since the probability is always between 0 and 1.
One of the disadvantages of the sigmoid function is that towards the end regions the Y values respond very less to the change in X values.
This results in a problem known as the vanishing gradient problem.
Vanishing gradient slows down the learning process and hence is undesirable.
Alternatives to Sigmoid Activation Function
ReLu Activation Function
A better alternative that solves this problem of vanishing gradient is the ReLu activation function.
The ReLu activation function returns 0 if the input is negative otherwise return the input as it is.
Mathematically it is represented as:
 Relu
Relu
You can implement it in Python as follows:
def relu(x):
    return max(0.0, x)
Let’s see how it works on some inputs.
def relu(x):
    return max(0.0, x)

x = 1.0
print('Applying Relu on (%.1f) gives %.1f' % (x, relu(x)))
x = -10.0
print('Applying Relu on (%.1f) gives %.1f' % (x, relu(x)))
x = 0.0
print('Applying Relu on (%.1f) gives %.1f' % (x, relu(x)))
x = 15.0
print('Applying Relu on (%.1f) gives %.1f' % (x, relu(x)))
x = -20.0
print('Applying Relu on (%.1f) gives %.1f' % (x, relu(x)))
Output:
- Applying Relu on (1.0) gives 1.0
- Applying Relu on (-10.0) gives 0.0
- Applying Relu on (0.0) gives 0.0
- Applying Relu on (15.0) gives 15.0
- Applying Relu on (-20.0) gives 0.0
Leaky ReLu Activation Function
The leaky ReLu addresses the problem of zero gradients for negative values, by giving an extremely small linear component of x to negative inputs.
Mathematically we can define it as:
- f(x) = 0.01x, x < 0
- f(x) = x, x >= 0
You can implement it in Python using:
def leaky_relu(x):
  if x > 0 :
    return x
  else :
    return 0.01*x

x = 1.0
print('Applying Leaky Relu on (%.1f) gives %.1f' % (x, leaky_relu(x)))

x = -10.0
print('Applying Leaky Relu on (%.1f) gives %.1f' % (x, leaky_relu(x)))

x = 0.0
print('Applying Leaky Relu on (%.1f) gives %.1f' % (x, leaky_relu(x)))

x = 15.0
print('Applying Leaky Relu on (%.1f) gives %.1f' % (x, leaky_relu(x)))

x = -20.0
print('Applying Leaky Relu on (%.1f) gives %.1f' % (x, leaky_relu(x)))
Output:
- Applying Leaky Relu on (1.0) gives 1.0
- Applying Leaky Relu on (-10.0) gives -0.1
- Applying Leaky Relu on (0.0) gives 0.0
- Applying Leaky Relu on (15.0) gives 15.0
- Applying Leaky Relu on (-20.0) gives -0.2
Conclusion
This tutorial was about the Sigmoid activation function. We learned how to implement and plot the function in python. Understanding the Sigmoid Activation Function in Python
Test your setup on ccloud³
Sign up for ccloud³ and receive €200 starting credit for your project.