
Spring MVC Tutorial
In this Spring MVC Tutorial, we will learn how to develop Spring MVC web application using Spring Tool Suite. Spring MVC framework is widely used for java web applications.
Spring MVC
Just like Struts Framework, Spring MVC is also based on Java EE Servlet and JSP technologies and implement Model-View-Controller design pattern.
We have earlier seen how Spring Dependency Injection works and in this tutorial we will learn how to create a simple web application using Spring MVC framework. We can use Eclipse or IntelliJ IDE for the Spring projects development, but SpringSource provides Spring Tool Suite (STS) that is an IDE based on Eclipse and comes with in-built VMware vFabric tc Server that is built on top of Apache Tomcat container and optimised for Spring-based applications. I would use STS for Spring MVC tutorial and other future tutorials because it makes a developer life easier by providing the following features:
- Support for creating skeletal Spring applications (MVC, Rest, Batch etc), good for starting the project from scratch. We will soon see in this spring MVC tutorial how easy it is to create a Spring MVC project.
- Provides useful features such as creating Spring Configuration files, parsing config files and classes to provide useful information about them.
- Automatic validation of Spring application
- Refactoring support to easily make project changes, the changes get reflected in config files too.
- Code assist for not only classes but configuration files too, I like this feature a lot because most of the times we need to know what we can use and its details.
- Best support for Aspect Oriented Programming (AOP) through the integration of AspectJ.
Looking at all the features STS provide, I was sold for this and decided to use it for Spring application and till now I am very happy with it. Just Download the STS from STS Official Download Page and install it. I am using STS 3.4.0.RELEASE that is based on Eclipse 4.3.1 release.
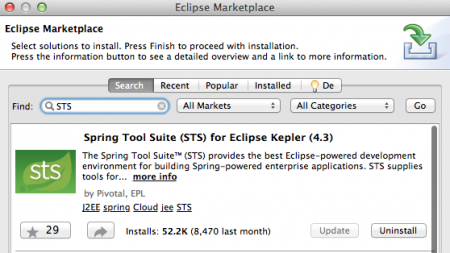
If you don’t want to use STS and want to get its facilities in existing Eclipse, then you need to install its plugin from Eclipse Marketplace. Use below image as a reference and make sure to chose the correct STS version for installation. Below plugin is good for Eclipse Kepler.
If you don’t want to use SpringSource server, you can deploy the application in any other Java EE container such as Tomcat, JBoss etc. For this tutorial, I will use the server that ships with STS but I have tested the application by exporting it as WAR file into separate tomcat server and it’s working fine. Now that our server environment and IDE is ready, let’s proceed to create our first Spring MVC project. Below steps are valid for STS as well as Eclipse with STS plugins.
Creating Spring MVC Application in STS or Eclipse
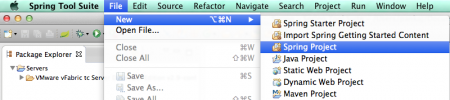
Step 1: Create New Spring Project from the menu.
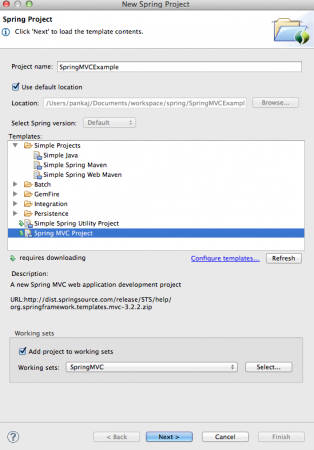
Step 2: In the new project window, give the name as “SpringMVCExample” and chose template as “Spring MVC Project”. If you are using this template for the first time, STS will download it from SpringSource website. If you want, you can add the project to any working set.
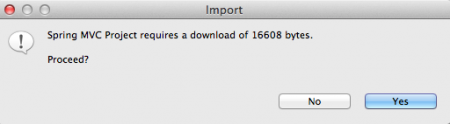
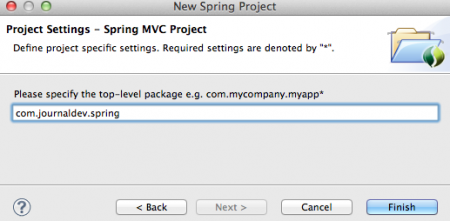
Step 3: When the template is downloaded, in the next screen you need to provide the top-level package name. This package will be used as the base-package for Spring components.
Step 4: Once the project is created by Spring MVC template, it will look like below image.
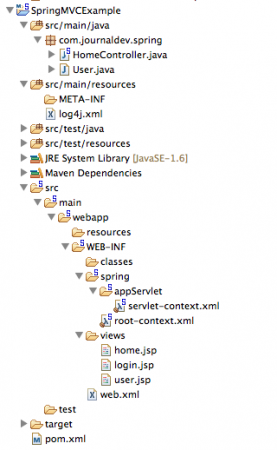
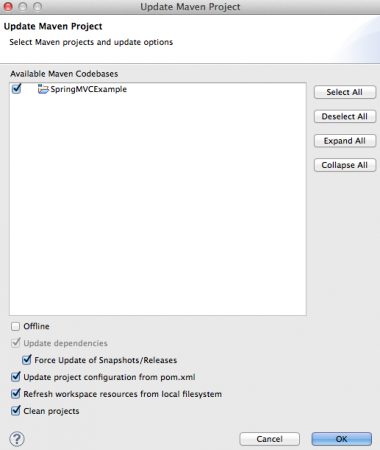
Don’t worry if you don’t see User.java class, login.jsp and user.jsp files, they have been added by me later on. If your project is not compiled and you see some errors, run Maven/Update Project. Make sure to check the “Force update of Snapshots/Releases” options, refer below image.
Overall project looks just like any other maven based web application with some Spring configuration files. Now it’s time to analyze the different part of the projects and extend it a little.
Spring MVC Dependencies
Our generated pom.xml file looks like below.
<?xml version="1.0" encoding="UTF-8"?>
<project xmlns="https://maven.apache.org/POM/4.0.0" xmlns:xsi="https://www.w3.org/2001/XMLSchema-instance"
    xsi:schemaLocation="https://maven.apache.org/POM/4.0.0 https://maven.apache.org/maven-v4_0_0.xsd">
    <modelVersion>4.0.0</modelVersion>
    <groupId>com.journaldev</groupId>
    <artifactId>SpringMVCExample</artifactId>
    <name>SpringMVCExample</name>
    <packaging>war</packaging>
    <version>1.0.0-BUILD-SNAPSHOT</version>
    <properties>
        <java-version>1.6</java-version>
        <org.springframework-version>4.0.0.RELEASE</org.springframework-version>
        <org.aspectj-version>1.7.4</org.aspectj-version>
        <org.slf4j-version>1.7.5</org.slf4j-version>
    </properties>
    <dependencies>
        <!-- Spring -->
        <dependency>
            <groupId>org.springframework</groupId>
            <artifactId>spring-context</artifactId>
            <version>${org.springframework-version}</version>
            <exclusions>
                <!-- Exclude Commons Logging in favor of SLF4j -->
                <exclusion>
                    <groupId>commons-logging</groupId>
                    <artifactId>commons-logging</artifactId>
                 </exclusion>
            </exclusions>
        </dependency>
        <dependency>
            <groupId>org.springframework</groupId>
            <artifactId>spring-webmvc</artifactId>
            <version>${org.springframework-version}</version>
        </dependency>

        <!-- AspectJ -->
        <dependency>
            <groupId>org.aspectj</groupId>
            <artifactId>aspectjrt</artifactId>
            <version>${org.aspectj-version}</version>
        </dependency>

        <!-- Logging -->
        <dependency>
            <groupId>org.slf4j</groupId>
            <artifactId>slf4j-api</artifactId>
            <version>${org.slf4j-version}</version>
        </dependency>
        <dependency>
            <groupId>org.slf4j</groupId>
            <artifactId>jcl-over-slf4j</artifactId>
            <version>${org.slf4j-version}</version>
            <scope>runtime</scope>
        </dependency>
        <dependency>
            <groupId>org.slf4j</groupId>
            <artifactId>slf4j-log4j12</artifactId>
            <version>${org.slf4j-version}</version>
            <scope>runtime</scope>
        </dependency>
        <dependency>
            <groupId>log4j</groupId>
            <artifactId>log4j</artifactId>
            <version>1.2.15</version>
            <exclusions>
                <exclusion>
                    <groupId>javax.mail</groupId>
                    <artifactId>mail</artifactId>
                </exclusion>
                <exclusion>
                    <groupId>javax.jms</groupId>
                    <artifactId>jms</artifactId>
                </exclusion>
                <exclusion>
                    <groupId>com.sun.jdmk</groupId>
                    <artifactId>jmxtools</artifactId>
                </exclusion>
                <exclusion>
                    <groupId>com.sun.jmx</groupId>
                    <artifactId>jmxri</artifactId>
                </exclusion>
            </exclusions>
            <scope>runtime</scope>
        </dependency>

        <!-- @Inject -->
        <dependency>
            <groupId>javax.inject</groupId>
            <artifactId>javax.inject</artifactId>
            <version>1</version>
        </dependency>

        <!-- Servlet -->
        <dependency>
            <groupId>javax.servlet</groupId>
            <artifactId>servlet-api</artifactId>
            <version>2.5</version>
            <scope>provided</scope>
        </dependency>
        <dependency>
            <groupId>javax.servlet.jsp</groupId>
            <artifactId>jsp-api</artifactId>
            <version>2.1</version>
            <scope>provided</scope>
        </dependency>
        <dependency>
            <groupId>javax.servlet</groupId>
            <artifactId>jstl</artifactId>
            <version>1.2</version>
        </dependency>

        <!-- Test -->
        <dependency>
            <groupId>junit</groupId>
            <artifactId>junit</artifactId>
            <version>4.7</version>
            <scope>test</scope>
        </dependency>
    </dependencies>
    <build>
        <plugins>
            <plugin>
                <artifactId>maven-eclipse-plugin</artifactId>
                <version>2.9</version>
                <configuration>
                    <additionalProjectnatures>
                        <projectnature>org.springframework.ide.eclipse.core.springnature</projectnature>
                    </additionalProjectnatures>
                    <additionalBuildcommands>
                        <buildcommand>org.springframework.ide.eclipse.core.springbuilder</buildcommand>
                    </additionalBuildcommands>
                    <downloadSources>true</downloadSources>
                    <downloadJavadocs>true</downloadJavadocs>
                </configuration>
            </plugin>
            <plugin>
                <groupId>org.apache.maven.plugins</groupId>
                <artifactId>maven-compiler-plugin</artifactId>
                <version>2.5.1</version>
                <configuration>
                    <source>1.6</source>
                    <target>1.6</target>
                    <compilerArgument>-Xlint:all</compilerArgument>
                    <showWarnings>true</showWarnings>
                    <showDeprecation>true</showDeprecation>
                </configuration>
            </plugin>
            <plugin>
                <groupId>org.codehaus.mojo</groupId>
                <artifactId>exec-maven-plugin</artifactId>
                <version>1.2.1</version>
                <configuration>
                    <mainClass>org.test.int1.Main</mainClass>
                </configuration>
            </plugin>
       </plugins>
    </build>
</project>
Our generated pom.xml file looks like below. The artifactId will be the servlet-context for the web application, so you can change it if you want something else. There are few properties defined for Spring Framework, AspectJ and SLF4j versions. I found that they were not reflecting the latest versions, so I have changed them to the latest stable version as of today. The project dependencies that I am interested in are;
- spring-context: Spring Core dependency. Notice the exclusion of commons logging in favor of SLF4J.
- spring-webmvc: Spring artifact for MVC support
- aspectjrt: AspectJ API reference
- SLF4J and Log4j: For logging purposes, Spring is very easy to configure for log4j or Java Logging API because of SLF4J integration.
- javax.inject – JSR330 API for dependency injection
There are some other dependencies added, such as Servlet, JSP, JSTL and JUnit API but for starter application, we can overlook them.
Spring MVC Tutorial – Log4j Configuration
The generated log4j.xml file looks like below. Notice that it’s printing everything to console, we can easily add appenders to redirect logging to files.
<?xml version="1.0" encoding="UTF-8"?>
<!DOCTYPE log4j:configuration PUBLIC "-//APACHE//DTD LOG4J 1.2//EN" "log4j.dtd">
<log4j:configuration xmlns:log4j="https://jakarta.apache.org/log4j/">

    <!-- Appenders -->
    <appender name="console" class="org.apache.log4j.ConsoleAppender">
        <param name="Target" value="System.out" />
        <layout class="org.apache.log4j.PatternLayout">
            <param name="ConversionPattern" value="%-5p: %c - %m%n" />
        </layout>
    </appender>

    <!-- Application Loggers -->
    <logger name="com.journaldev.spring">
        <level value="info" />
    </logger>

    <!-- 3rdparty Loggers -->
    <logger name="org.springframework.core">
        <level value="info" />
    </logger>

    <logger name="org.springframework.beans">
        <level value="info" />
    </logger>

    <logger name="org.springframework.context">
        <level value="info" />
    </logger>

    <logger name="org.springframework.web">
        <level value="info" />
    </logger>

    <!-- Root Logger -->
    <root>
        <priority value="warn" />
        <appender-ref ref="console" />
    </root>

</log4j:configuration>
Spring MVC Tutorial – Deployment Descriptor Configuration
Let’s see our web.xml and analyze it.
<?xml version="1.0" encoding="UTF-8"?>
<web-app version="2.5" xmlns="https://java.sun.com/xml/ns/javaee"
    xmlns:xsi="https://www.w3.org/2001/XMLSchema-instance"
    xsi:schemaLocation="https://java.sun.com/xml/ns/javaee https://java.sun.com/xml/ns/javaee/web-app_2_5.xsd">

    <!-- The definition of the Root Spring Container shared by all Servlets and Filters -->
    <context-param>
        <param-name>contextConfigLocation</param-name>
        <param-value>/WEB-INF/spring/root-context.xml</param-value>
    </context-param>

    <!-- Creates the Spring Container shared by all Servlets and Filters -->
    <listener>
        <listener-class>org.springframework.web.context.ContextLoaderListener</listener-class>
    </listener>

    <!-- Processes application requests -->
    <servlet>
        <servlet-name>appServlet</servlet-name>
        <servlet-class>org.springframework.web.servlet.DispatcherServlet</servlet-class>
        <init-param>
            <param-name>contextConfigLocation</param-name>
            <param-value>/WEB-INF/spring/appServlet/servlet-context.xml</param-value>
        </init-param>
        <load-on-startup>1</load-on-startup>
    </servlet>

    <servlet-mapping>
        <servlet-name>appServlet</servlet-name>
        <url-pattern>/</url-pattern>
    </servlet-mapping>

</web-app>
ContextLoaderListener ties the ApplicationContext lifecycle to ServletContext lifecycle and automate the creation of ApplicationContext. ApplicationContext is the place for Spring beans and we can provide it’s configuration through contextConfigLocation context parameter. root-context.xml file provides the configuration details for WebApplicationContext. DispatcherServlet is the controller class for Spring MVC application and all the client requests are getting handled by this servlet. The configuration is being loaded from the servlet-context.xml file.
Spring MVC Tutorial – Configuration Files
root-context.xml file:
<?xml version="1.0" encoding="UTF-8"?>
<beans xmlns="https://www.springframework.org/schema/beans"
    xmlns:xsi="https://www.w3.org/2001/XMLSchema-instance"
    xsi:schemaLocation="https://www.springframework.org/schema/beans https://www.springframework.org/schema/beans/spring-beans.xsd">

    <!-- Root Context: defines shared resources visible to all other web components -->

</beans>
We can define shared beans here, as of now there is nothing in it.
servlet-context.xml code:
<?xml version="1.0" encoding="UTF-8"?>
<beans:beans xmlns="https://www.springframework.org/schema/mvc"
    xmlns:xsi="https://www.w3.org/2001/XMLSchema-instance"
    xmlns:beans="https://www.springframework.org/schema/beans"
    xmlns:context="https://www.springframework.org/schema/context"
    xsi:schemaLocation="https://www.springframework.org/schema/mvc https://www.springframework.org/schema/mvc/spring-mvc.xsd
        https://www.springframework.org/schema/beans https://www.springframework.org/schema/beans/spring-beans.xsd
        https://www.springframework.org/schema/context https://www.springframework.org/schema/context/spring-context.xsd">

    <!-- DispatcherServlet Context: defines this servlet's request-processing infrastructure -->

    <!-- Enables the Spring MVC @Controller programming model -->
    <annotation-driven />

    <!-- Handles HTTP GET requests for /resources/** by efficiently serving up static resources in the ${webappRoot}/resources directory -->
    <resources mapping="/resources/**" location="/resources/" />

    <!-- Resolves views selected for rendering by @Controllers to .jsp resources in the /WEB-INF/views directory -->
    <beans:bean class="org.springframework.web.servlet.view.InternalResourceViewResolver">
        <beans:property name="prefix" value="/WEB-INF/views/" />
        <beans:property name="suffix" value=".jsp" />
    </beans:bean>

    <context:component-scan base-package="com.journaldev.spring" />

</beans:beans>
This is how the standard Spring configuration file looks like, just imagine writing all this on your own and you will start liking STS tool. The annotation-driven element is used to let Controller servlet know that annotations will be used for bean configurations. The resources element defines the location where we can put static files such as images, HTML pages etc that we don’t want to get through Spring framework. InternalResourceViewResolver is the view resolver, we can provide view pages location through prefix and suffix properties. So all our JSP pages should be in /WEB-INF/views/ directory. The context:component-scan element is used to provide the base-package location for scanning Controller classes. Remember the value of the top-level package given at the time of project creation, it’s the same value getting used here.
Spring MVC Controller Class
HomeController is created automatically with the home() method, although I have extended it a little bit by adding loginPage() and login() methods.
package com.journaldev.spring;

import java.text.DateFormat;
import java.util.Date;
import java.util.Locale;

import org.slf4j.Logger;
import org.slf4j.LoggerFactory;
import org.springframework.stereotype.Controller;
import org.springframework.ui.Model;
import org.springframework.validation.annotation.Validated;
import org.springframework.web.bind.annotation.RequestMapping;
import org.springframework.web.bind.annotation.RequestMethod;

/**
 * Handles requests for the application home page.
 */
@Controller
public class HomeController {

    private static final Logger logger = LoggerFactory.getLogger(HomeController.class);

    /**
     * Simply selects the home view to render by returning its name.
     */
    @RequestMapping(value = "/", method = RequestMethod.GET)
    public String home(Locale locale, Model model) {
        logger.info("Welcome home! The client locale is {}.", locale);

        Date date = new Date();
        DateFormat dateFormat = DateFormat.getDateTimeInstance(DateFormat.LONG, DateFormat.LONG, locale);

        String formattedDate = dateFormat.format(date);

        model.addAttribute("serverTime", formattedDate );

        return "home";
    }

    @RequestMapping(value = "/login", method = RequestMethod.GET)
    public String loginPage(Locale locale, Model model) {
        return "login";
    }

    @RequestMapping(value = "/home", method = RequestMethod.POST)
    public String login(@Validated User user, Model model) {
        model.addAttribute("userName", user.getUserName());
        return "user";
    }
}
@Controller annotation is used to indicate that it’s a web controller class. @RequestMapping is used with classes and methods to redirect the client request to specific handler method. Notice that handler methods are returning String, this should be the name of view page to be used as the response. As you can see that we are having three methods returning different strings, so we need to create JSP pages with the same name. Notice that login() method will get called with HTTP method as POST, so we are expecting some form data here. So we have User model class and it’s marked for validation using @Validated annotation. Every method contains Model as an argument and we can set attributes to be later used in the JSP response pages.
Spring MVC Model Classes
Model classes are used to hold form variables, our User model bean looks like below.
package com.journaldev.spring;

public class User {

    private String userName;

    public String getUserName() {
        return userName;
    }

    public void setUserName(String userName) {
        this.userName = userName;
    }

}
A simple java bean with the variable name and its getter and setter methods.
Spring MVC Tutorial – View Pages
home.jsp code:
<%@ taglib uri="https://java.sun.com/jsp/jstl/core" prefix="c" %>
<%@ page session="false" %>
<html>
<head>
    <title>Home</title>
</head>
<body>
<h1>
    Hello world!
</h1>

<P>  The time on the server is ${serverTime}. </P>
</body>
</html>
Notice the use of JSP Expression Language to get the attribute values.
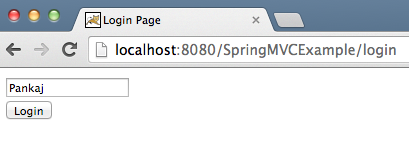
login.jsp code:
<%@ page language="java" contentType="text/html; charset=UTF-8"
    pageEncoding="UTF-8"%>
<!DOCTYPE html PUBLIC "-//W3C//DTD HTML 4.01 Transitional//EN" "https://www.w3.org/TR/html4/loose.dtd">
<html>
<head>
<meta http-equiv="Content-Type" content="text/html; charset=UTF-8">
<title>Login Page</title>
</head>
<body>
<form action="home" method="post">
<input type="text" name="userName"><br>
<input type="submit" value="Login">
</form>
</body>
</html>
A simple JSP page for the user to provide the userName as input. Notice that form variable name is same as User class variable name. Also, form action is “home” and method is “post”. It’s clear that HomeController login() method will handle this request.
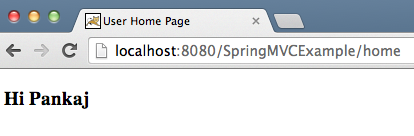
user.jsp code:
<%@ page language="java" contentType="text/html; charset=UTF-8"
    pageEncoding="UTF-8"%>
<!DOCTYPE html PUBLIC "-//W3C//DTD HTML 4.01 Transitional//EN" "https://www.w3.org/TR/html4/loose.dtd">
<html>
<head>
<meta http-equiv="Content-Type" content="text/html; charset=UTF-8">
<title>User Home Page</title>
</head>
<body>
<h3>Hi ${userName}</h3>
</body>
</html>
Simple home page for the user where username is displayed, notice that we are setting this attribute in the login method.
Spring MVC Example Application Testing
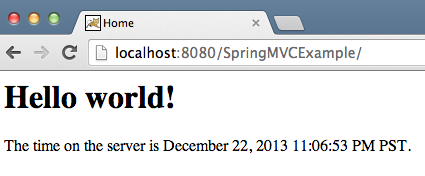
Our application is ready for execution, just run it on the VMware tc Server or your choice of any other servlet container, you will get below pages as the response.
That’s it for Spring MVC Tutorial, you can see that how easy it is to create a Spring MVC application using STS plugins. The code size is very less and most of the configuration is handled by Spring MVC so that we can focus on business logic.
