
SOAP Webservices in Java Example
Soap Webservices in java can be developed in may ways. We learned about JAX-WS SOAP Web Services in our last tutorial, today we will learn how we can create SOAP web service and it’s client program using Eclipse. Here we will not use JAX-WS, we will be using Apache Axis that is integrated in the Eclipse and provide quick and easy way to transform a application into Java Web Service and create client stubs with test JSP page for testing purpose.
SOAP Webservices in Java
I am using Eclipse Mars Release (4.5.0) for this tutorial but I think these steps will work with older versions of eclipse too. Also make sure you have added Apache Tomcat or any other servlet container as server in the Eclipse. Let’s start with our Eclipse Web Service implementation now.
SOAP Web Service Example in Eclipse
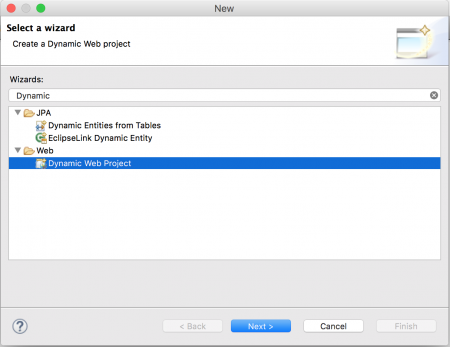
Let’s get started with our SOAP web service example in Eclipse. First of all we will create a simple Dynamic Web Project in Eclipse that will contain the business logic for our application.
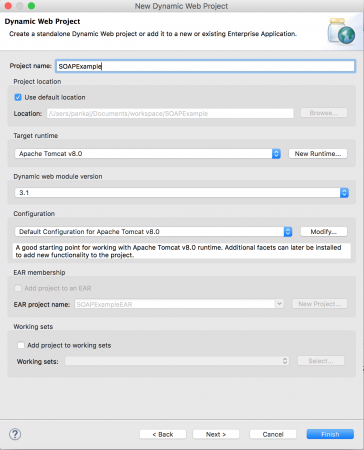
Click on Next button above and you will get next page to provide your web project name and Target Runtime. Notice that I am using Apache Tomcat 8, you can use any other standard servlet container too.
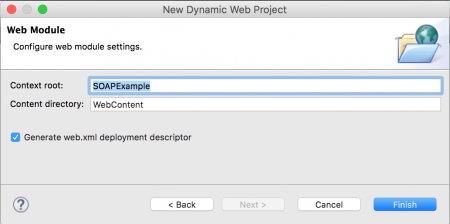
Click on Next and you will be asked to provide “Context Root” and Content Directory location. You can leave them as default.
Click on Finish and Eclipse will create the project skeleton for you. Let’s get started with our business logic. So for our example, we would like to publish a web service that can be used to add/delete/get an object. So first step is to create a model bean.
package com.journaldev.jaxws.beans;

import java.io.Serializable;

public class Person implements Serializable{

	private static final long serialVersionUID = -5577579081118070434L;

	private String name;
	private int age;
	private int id;

	public String getName() {
		return name;
	}

	public void setName(String name) {
		this.name = name;
	}

	public int getAge() {
		return age;
	}

	public void setAge(int age) {
		this.age = age;
	}

	public int getId() {
		return id;
	}

	public void setId(int id) {
		this.id = id;
	}

	@Override
	public String toString(){
		return id+"::"+name+"::"+age;
	}

}
Notice that above is a simple java bean, we are implementing Serializable interface because we will be transporting it over the network. We have also provided toString method implementation that will be used when we will print this object at client side. Next step is to create service classes, so we will have an interface as PersonService and it’s simple implementation class PersonServiceImpl.
package com.journaldev.jaxws.service;

import com.journaldev.jaxws.beans.Person;

public interface PersonService {

	public boolean addPerson(Person p);

	public boolean deletePerson(int id);

	public Person getPerson(int id);

	public Person[] getAllPersons();
}
Below is the implementation service class, we are using Map to store Person objects as data source. In real world programming, we would like to save these into database tables.
package com.journaldev.jaxws.service;

import java.util.HashMap;
import java.util.Map;
import java.util.Set;

import com.journaldev.jaxws.beans.Person;

public class PersonServiceImpl implements PersonService {

	private static Map<Integer,Person> persons = new HashMap<Integer,Person>();

	@Override
	public boolean addPerson(Person p) {
		if(persons.get(p.getId()) != null) return false;
		persons.put(p.getId(), p);
		return true;
	}

	@Override
	public boolean deletePerson(int id) {
		if(persons.get(id) == null) return false;
		persons.remove(id);
		return true;
	}

	@Override
	public Person getPerson(int id) {
		return persons.get(id);
	}

	@Override
	public Person[] getAllPersons() {
		Set ids = persons.keySet();
		Person[] p = new Person[ids.size()];
		int i=0;
		for(Integer id : ids){
			p[i] = persons.get(id);
			i++;
		}
		return p;
	}

}
That’s it for our business logic, since we will use these in a web service, there is no point of creating web pages here. Notice that we have no reference to any kind of web services classes in above code.
SOAP Webservices in Java using Eclipse
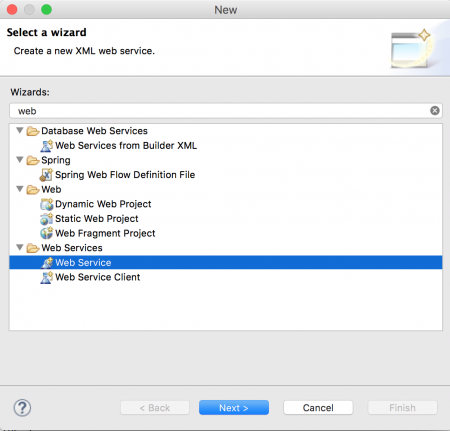
Once our business logic is ready, the next step is to use Eclipse to create a web service application from this. Create a new project and select the Web Service wizard.
Click the Next button and you will get a page where web service and its client details have to be provided. This is the most important page in creating a web service. Make sure you select “Web Service type” as “Bottom up Java bean Web Service” because we are implementing with a bottom-up approach. There are two ways to create a web service:
- Contract last or Bottom up approach: In this approach, we first create the implementation and then generate the WSDL file from it. Our implementation fits in this category.
- Contract first or Top Down Approach: In this approach, we first create the web service contract i.e., WSDL file and then create the implementation for it.
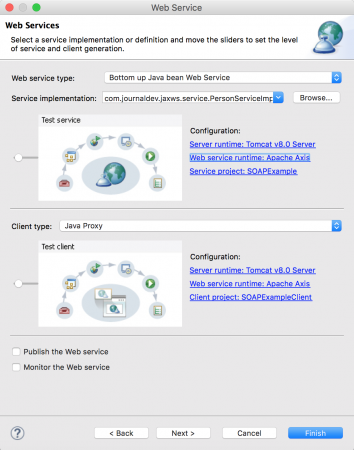
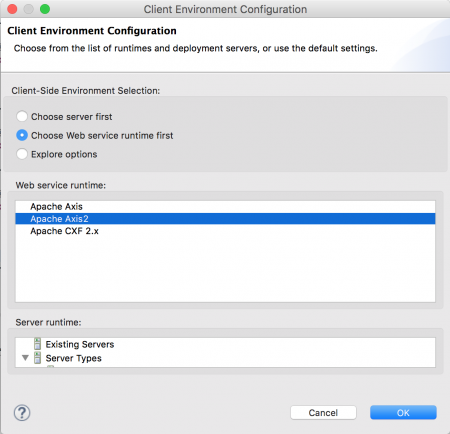
In the service implementation, provide the implementation class PersonServiceImpl fully classified path. Make sure you move the slider in service and client type to left side so that it can generate client program and also UI to test our web service. Check for the configurations in web service implementation, you should provide correct details for Server runtime, Web service runtime and service project. Usually they are auto populated and you don’t need to make any changes here. For client configurations, you can provide the client project name as you like. I have left it to default as SOAPExampleClient. If you will click on the link for web service runtime, you will get different options as shown in below image. However I have left it as the default one.
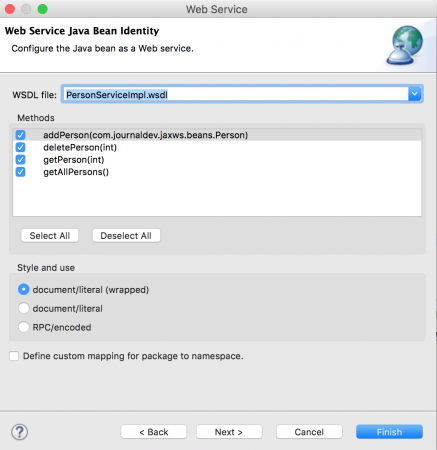
Click on the Next button and then you will be able to choose the methods that you want to expose as a web service. You will also be able to choose the web service style as either document or literal. You can change the WSDL document name but it’s good to have it with the implementation class name to avoid confusion later on.
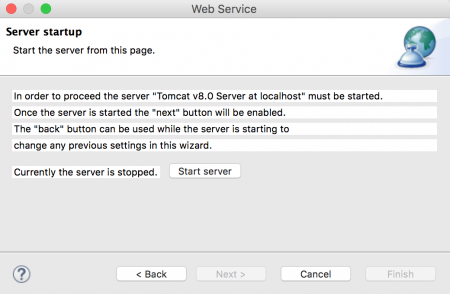
Click on the Next button and you will get the server startup page, click on the “Start server” button and then the next button will enable.
Click on the Next button and you will get a page to launch the “Web Services Explorer”.
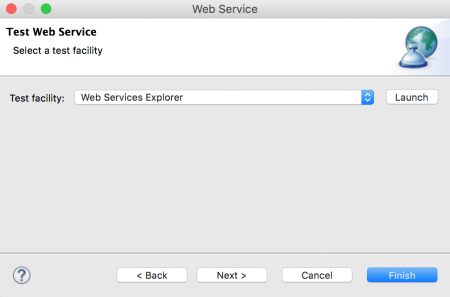
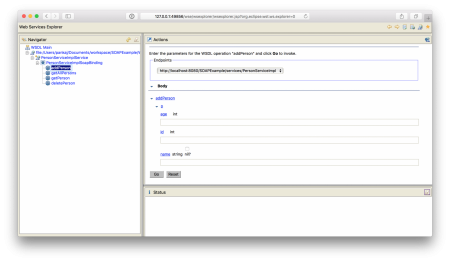
Click on the Launch button and it will open a new window in the browser where you can test your web service before moving ahead with the client application part. It looks like the below image for our project.
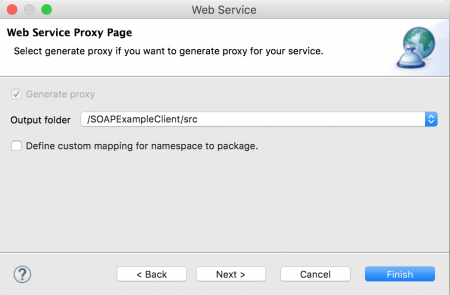
We can do some sanity testing here, but for our simple application, I am ready to go ahead with client application creation. Click on the Next button in the Eclipse web services popup window and you will get a page for the source folder for the client application.
Click on the Next button and you will get different options to choose as a test facility. I am going ahead with JAX-RPC JSPs so that the client application will generate a JSP page that we can use.
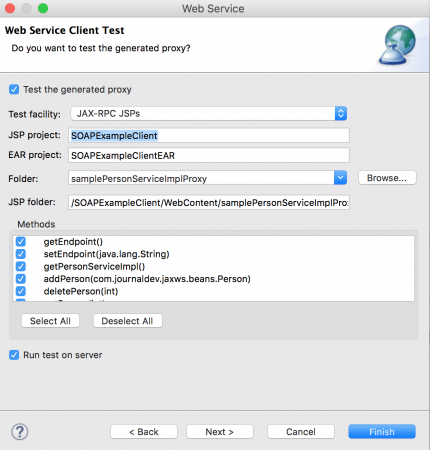
Notice the methods getEndpoint() and setEndpoint(String) added that we can use to get the web service endpoint URL and we can set it to some other URL in case we move our server to some other URL endpoint. Click on the Finish button and Eclipse will create the client project in your workspace, it will also launch the client test JSP page as shown below.

You can copy the URL and open it in any browser you would like. Let’s test some of the services that we have exposed and see the output.
Eclipse SOAP Web Service Test
-
- addPerson
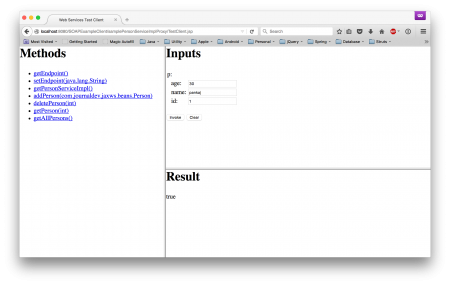
-
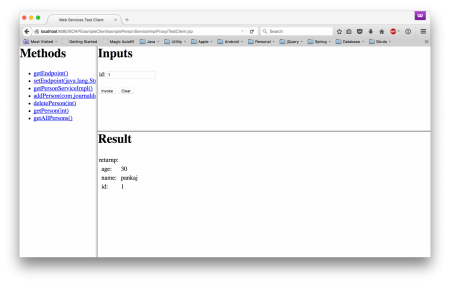
- getPerson
-
- getAllPersons
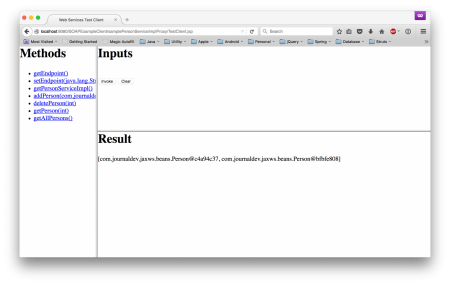
Notice that Person details are not printed in the results section, this is because it’s auto-generated code and we need to refactor it a little to get the desired output. Open Result.jsp in the client project and you will see it’s using a switch case to generate the result output. For the getAllPersons() method, it was case 42 in my case. Note that it could be totally different in your case. I just changed the code for case 42 as shown below.
case 42:
        gotMethod = true;
        com.journaldev.jaxws.beans.Person[] getAllPersons42mtemp = samplePersonServiceImplProxyid.getAllPersons();
if(getAllPersons42mtemp == null){
%>
<%=getAllPersons42mtemp %>
<%
}else{
        String tempreturnp43 = null;
        if(getAllPersons42mtemp != null){
        java.util.List listreturnp43= java.util.Arrays.asList(getAllPersons42mtemp);
        //tempreturnp43 = listreturnp43.toString();
        for(com.journaldev.jaxws.beans.Person p : listreturnp43){
        	int id = p.getId();
        	int age = p.getAge();
        	String name=p.getName();
        	%>
        	<%=id%>::<%=name %>::<%=age %>
        	<%
        	}
        }
        }
break;
After that, we get the below output, note that Eclipse is doing hot deployment here, so I didn’t have to redeploy my application.
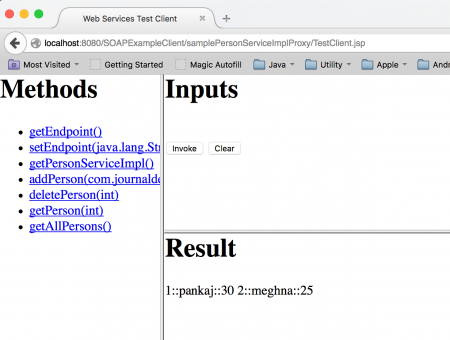
So it looks like our web service and client applications are working fine, make sure to spend some time looking at the client-side stubs generated by Eclipse to understand more.
SOAP Web Service WSDL and Configs
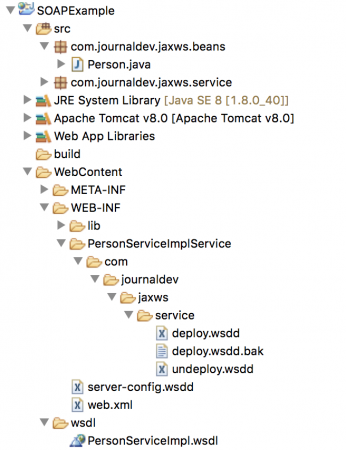
Finally, you will notice that the WSDL file is generated in the web service project as below. PersonServiceImpl.wsdl code:
<?xml version="1.0" encoding="UTF-8"?>
<wsdl:definitions targetNamespace="https://service.jaxws.journaldev.com" xmlns:apachesoap="https://xml.apache.org/xml-soap" xmlns:impl="https://service.jaxws.journaldev.com" xmlns:intf="https://service.jaxws.journaldev.com" xmlns:tns1="https://beans.jaxws.journaldev.com" xmlns:wsdl="https://schemas.xmlsoap.org/wsdl/" xmlns:wsdlsoap="https://schemas.xmlsoap.org/wsdl/soap/" xmlns:xsd="https://www.w3.org/2001/XMLSchema">

 <wsdl:types>
  <schema elementFormDefault="qualified" targetNamespace="https://service.jaxws.journaldev.com" xmlns="https://www.w3.org/2001/XMLSchema">
   <import namespace="https://beans.jaxws.journaldev.com"/>
   <element name="addPerson">
    <complexType>
     <sequence>
      <element name="p" type="tns1:Person"/>
     </sequence>
    </complexType>
   </element>
   <element name="addPersonResponse">
    <complexType>
     <sequence>
      <element name="addPersonReturn" type="xsd:boolean"/>
     </sequence>
    </complexType>
   </element>
   <element name="deletePerson">
    <complexType>
     <sequence>
      <element name="id" type="xsd:int"/>
     </sequence>
    </complexType>
   </element>
   <element name="deletePersonResponse">
    <complexType>
     <sequence>
      <element name="deletePersonReturn" type="xsd:boolean"/>
     </sequence>
    </complexType>
   </element>
   <element name="getPerson">
    <complexType>
     <sequence>
      <element name="id" type="xsd:int"/>
     </sequence>
    </complexType>
   </element>
   <element name="getPersonResponse">
    <complexType>
     <sequence>
      <element name="getPersonReturn" type="tns1:Person"/>
     </sequence>
    </complexType>
   </element>
   <element name="getAllPersons">
    <complexType/>
   </element>
   <element name="getAllPersonsResponse">
    <complexType>
     <sequence>
      <element maxOccurs="unbounded" name="getAllPersonsReturn" type="tns1:Person"/>
     </sequence>
    </complexType>
   </element>
  </schema>
  <schema elementFormDefault="qualified" targetNamespace="https://beans.jaxws.journaldev.com" xmlns="https://www.w3.org/2001/XMLSchema">
   <complexType name="Person">
    <sequence>
     <element name="age" type="xsd:int"/>
     <element name="id" type="xsd:int"/>
     <element name="name" nillable="true" type="xsd:string"/>
    </sequence>
   </complexType>
  </schema>
 </wsdl:types>
<wsdl:message name="addPersonResponse">
  <wsdl:part element="impl:addPersonResponse" name="parameters">
  </wsdl:part>
</wsdl:message>

<wsdl:message name="getAllPersonsResponse">
  <wsdl:part element="impl:getAllPersonsResponse" name="parameters">
  </wsdl:part>
</wsdl:message>

<wsdl:message name="deletePersonResponse">
  <wsdl:part element="impl:deletePersonResponse" name="parameters">
  </wsdl:part>
</wsdl:message>

<wsdl:message name="addPersonRequest">
  <wsdl:part element="impl:addPerson" name="parameters">
  </wsdl:part>
</wsdl:message>

<wsdl:message name="getPersonResponse">
  <wsdl:part element="impl:getPersonResponse" name="parameters">
  </wsdl:part>
</wsdl:message>

<wsdl:message name="getPersonRequest">
  <wsdl:part element="impl:getPerson" name="parameters">
  </wsdl:part>
</wsdl:message>

<wsdl:message name="deletePersonRequest">
  <wsdl:part element="impl:deletePerson" name="parameters">
  </wsdl:part>
</wsdl:message>

<wsdl:message name="getAllPersonsRequest">
  <wsdl:part element="impl:getAllPersons" name="parameters">
  </wsdl:part>
</wsdl:message>

<wsdl:portType name="PersonServiceImpl">
  <wsdl:operation name="addPerson">
    <wsdl:input message="impl:addPersonRequest" name="addPersonRequest">
    </wsdl:input>
    <wsdl:output message="impl:addPersonResponse" name="addPersonResponse">
    </wsdl:output>
  </wsdl:operation>

  <wsdl:operation name="deletePerson">
    <wsdl:input message="impl:deletePersonRequest" name="deletePersonRequest">
    </wsdl:input>
    <wsdl:output message="impl:deletePersonResponse" name="deletePersonResponse">
    </wsdl:output>
  </wsdl:operation>

  <wsdl:operation name="getPerson">
    <wsdl:input message="impl:getPersonRequest" name="getPersonRequest">
    </wsdl:input>
    <wsdl:output message="impl:getPersonResponse" name="getPersonResponse">
    </wsdl:output>
  </wsdl:operation>

  <wsdl:operation name="getAllPersons">
    <wsdl:input message="impl:getAllPersonsRequest" name="getAllPersonsRequest">
    </wsdl:input>
    <wsdl:output message="impl:getAllPersonsResponse" name="getAllPersonsResponse">
    </wsdl:output>
  </wsdl:operation>
</wsdl:portType>

<wsdl:binding name="PersonServiceImplSoapBinding" type="impl:PersonServiceImpl">
  <wsdlsoap:binding style="document" transport="https://schemas.xmlsoap.org/soap/http"/>
  <wsdl:operation name="addPerson">
    <wsdlsoap:operation soapAction=""/>
    <wsdl:input name="addPersonRequest">
      <wsdlsoap:body use="literal"/>
    </wsdl:input>
    <wsdl:output name="addPersonResponse">
      <wsdlsoap:body use="literal"/>
    </wsdl:output>
  </wsdl:operation>

  <wsdl:operation name="deletePerson">
    <wsdlsoap:operation soapAction=""/>
    <wsdl:input name="deletePersonRequest">
      <wsdlsoap:body use="literal"/>
    </wsdl:input>
    <wsdl:output name="deletePersonResponse">
      <wsdlsoap:body use="literal"/>
    </wsdl:output>
  </wsdl:operation>

  <wsdl:operation name="getPerson">
    <wsdlsoap:operation soapAction=""/>
    <wsdl:input name="getPersonRequest">
      <wsdlsoap:body use="literal"/>
    </wsdl:input>
    <wsdl:output name="getPersonResponse">
      <wsdlsoap:body use="literal"/>
    </wsdl:output>
  </wsdl:operation>

  <wsdl:operation name="getAllPersons">
    <wsdlsoap:operation soapAction=""/>
    <wsdl:input name="getAllPersonsRequest">
      <wsdlsoap:body use="literal"/>
    </wsdl:input>
    <wsdl:output name="getAllPersonsResponse">
      <wsdlsoap:body use="literal"/>
    </wsdl:output>
  </wsdl:operation>
</wsdl:binding>

<wsdl:service name="PersonServiceImplService">
  <wsdl:port binding="impl:PersonServiceImplSoapBinding" name="PersonServiceImpl">
    <wsdlsoap:address location="https://localhost:8080/SOAPExample/services/PersonServiceImpl"/>
  </wsdl:port>
</wsdl:service>

</wsdl:definitions>
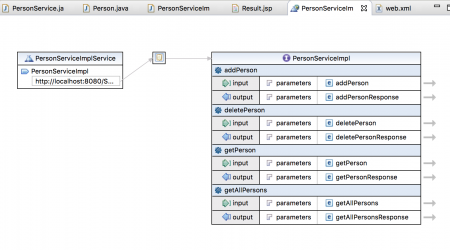
If you will open it in design mode in Eclipse, it will look like below image.
You can also access web service WSDL file through browser by appending ?wsdl to the web service endpoint.

You will also note that web.xml is modified to use Apache Axis as front controller for web service.
<?xml version="1.0" encoding="UTF-8"?>
<web-app xmlns:xsi="https://www.w3.org/2001/XMLSchema-instance" xmlns="https://xmlns.jcp.org/xml/ns/javaee" xsi:schemaLocation="https://xmlns.jcp.org/xml/ns/javaee https://xmlns.jcp.org/xml/ns/javaee/web-app_3_1.xsd" id="WebApp_ID" version="3.1">
  <display-name>SOAPExample</display-name>
  <welcome-file-list>
    <welcome-file>index.html</welcome-file>
    <welcome-file>index.htm</welcome-file>
    <welcome-file>index.jsp</welcome-file>
    <welcome-file>default.html</welcome-file>
    <welcome-file>default.htm</welcome-file>
    <welcome-file>default.jsp</welcome-file>
  </welcome-file-list>
  <servlet>
    <display-name>Apache-Axis Servlet</display-name>
    <servlet-name>AxisServlet</servlet-name>
    <servlet-class>org.apache.axis.transport.http.AxisServlet</servlet-class>
  </servlet>
  <servlet-mapping>
    <servlet-name>AxisServlet</servlet-name>
    <url-pattern>/servlet/AxisServlet</url-pattern>
  </servlet-mapping>
  <servlet-mapping>
    <servlet-name>AxisServlet</servlet-name>
    <url-pattern>*.jws</url-pattern>
  </servlet-mapping>
  <servlet-mapping>
    <servlet-name>AxisServlet</servlet-name>
    <url-pattern>/services/*</url-pattern>
  </servlet-mapping>
  <servlet>
    <display-name>Axis Admin Servlet</display-name>
    <servlet-name>AdminServlet</servlet-name>
    <servlet-class>org.apache.axis.transport.http.AdminServlet</servlet-class>
    <load-on-startup>100</load-on-startup>
  </servlet>
  <servlet-mapping>
    <servlet-name>AdminServlet</servlet-name>
    <url-pattern>/servlet/AdminServlet</url-pattern>
  </servlet-mapping>
</web-app>
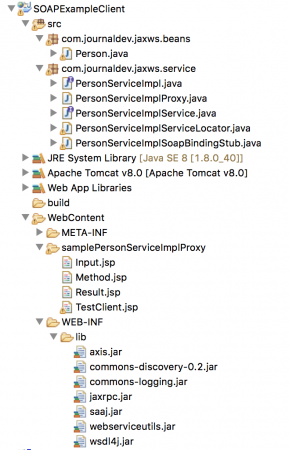
Below image shows the web service and client project with all the auto generated stubs and JSP pages to test the web service.
That’s all for soap webservices in java example using Eclipse, as you can see that all the hard part was done by Eclipse automatically and all our focus was to write business logic for our web service.
